Showing posts with label root vegetables. Show all posts

Thursday, January 12, 2017

January in the Garden


January is traditionally the time of day dreaming and planning for gardeners young and old.  Garden catalogs begin trickling in, tantalizing us with rediscovered heirlooms as well as new and improved flowers and foods.  Slowly we work through each catalog revising the list of everything we want, until we can be satisfied with what we really need and what we really have time and space for.  But many a cold, rainy day is cheered with all the possibilities.  

If you aren’t already inundated with gardening catalogs check out this blog post from ‘The Garden Glove’ on the Top 12 Garden Seed Catalogs:   <http://www.thegardenglove.com/top-garden-seed-catalogs/ >.  It contains most of my favorites, many of which are free on request.  When you click on a catalog name you are sent to their web site.  Most seed companies feature a link to a page where you can request a free copy of their catalog right on their home page.  If you don’t have Internet service, stop by one of our local libraries. Most libraries (including ours) have public access computers available, and someone is usually available to give you a hand or help you sign up for a class or a tutor.


Planing for Peppers

Believe it or not, now is the time to plan for peppers.  Peppers do an outstanding job when our summers are hot.  However, our cool spring weather can get them off to a dismal start. They tend to be very slow growing when young; the cooler it is, the slower they grow.  A little planning ahead will help you grow the best pepper crop ever.  Peppers of all kinds can be started inside (in late January or early February) if you can provide a warm location and bright light. Peppers germinate best with soil temperatures between 75 and 80 degrees. You can get a good guestimate of indoor soil temperature by laying a room thermometer down on the surface where you will place your seeded six packs. It may take some experimenting to find the right location. You need the seeded six packs to stay warm at night, but not get over heated during the day when they are under lights. Many people resort to special heating mats made for starting seeds; others skip the seed starting step and purchase young plants ready to harden off and slip into the ground.  If you want to grow your own peppers from seed, it is a good idea to find your spot or shop for a heating mat now. Most nurseries and garden catalogs keep them in stock, especially this time of year. Shop around; prices for exactly the same set up can vary greatly.

In January our minds are on catalogs, even when thinking of peppers. If you are interested in growing organic heirloom peppers, The Seed Savers Exchange has a great catalog.  Seed Savers offers seedlings of eight different heirlooms, three of which are hot, with the rest being mild or sweet.  You can mix and match or order a sampler pack.  And they have an amazing variety, nearly 50 different kinds of peppers, available as seed. (563) 382-5900 / <www.SeedSavers.org>.  If the latest hybrids are what you want; Burpee has in a dazzling variety, many available as seedlings or seeds.  (800) 487-5530 / <www.Burpee.com>.  If you are hoping for peppers even if next summer is cool, then you should visit Territorial Seeds. They have an awesome selection of both seeds and plants that have been proven to do well in the Pacific North West. 800-626-0866 / <http://www.territorialseed.com/>. You can request a catalog on-line or by from any of these companies.

Once you get your seeds growing or your plants delivered, you will want to keep them in containers until all threat of frost has past.  They will enjoy spending warm days outside, at first in the shade.  Each day they should be exposed to more and more sun, until they are ready to stick their feet in the soil and thrive.  Don’t forget to bring them in at night if it might get down close to freezing.  Save your peppers a sunny spot in the garden and they will reward you with a bountiful harvest.


Fresh Produce From the Garden

Winter’s crisp cold nights have an uncanny effect on many root vegetables, turning them sweeter than if they were grown in the summer. If you planted parsnips last spring; carrots, rutabagas, or turnips this fall—you can look forward to a special treat. Get out your shovel next time we get a break from the rain and use it to carefully loosen the soil around these delectable roots.  Dig only as many as you will need for a few days; they will stay sweeter and fresher in the ground than they will in the fridge.  You can use them in most any dish that comes to mind, such as home-made soups, casseroles, stir fries, or grated into salads.  For a real treat try roasting up a batch of mixed veggies. Roasting brings out the flavors of fresh dug winter roots like nothing else can, whether you throw them in next to a pot roast or a nice fat hen; or if you just roast them up on their own. 

Here is a veggie roasting technique that doesn’t require using parchment or any other fancy supplies. You can use a metal cookie sheet or a baking pan--whatever you happen to have on hand (and is safe for use under the broiler). Scrub up your veggies and cut them into pieces about two inches long by an inch wide and a half inch thick. Brush your pan and the veggies with a thin coat of olive oil. (If you don’t have olive oil, use whatever you have on hand.)  You can sprinkle them with a little salt and pepper or other seasoning if you like. Place your veggies in a single layer on your pan, and set your oven rack so the surface of the veggies will be about five inches from the heat.  Turn the oven on to broil, and keep a close eye on the veggies.  After about five minutes, as they begin to brown, you want to move them around on the pan so they don’t stick.  Continue checking them every three to five minutes. As they develop a nice warm color, pull the pan from the oven, brush their tops with oil and flip them over.  They won’t all be ready to flip, nor will they all be ready to remove from the oven at the same time.  But every time you turn or remove some, the rest can be shifted just a bit to keep them from sticking.  If you don’t devour these delectable morsels as soon as they cool, you can serve them as a side dish; arrange them on lettuce or other greens, toss them with pasta, tuck them into a sandwich, or offer them as a finger food with a little dip.  

However you serve them, the results are elegant. And it is so easy to prepare.  It is best to stay in the kitchen while they cook, because you don’t want to let your poor roots get scorched.  You can use the time to toss a salad or set the table.  It’s fun and it’s yum!

~~~

Published by the Willapa Harbor Herald, December 4th, 2017.  Posted here with permission.

A previous version was previously published by the Hoopa People News, in 2007.

Copyright 2017,  Harvest McCampbell.  Please feel free to use the buttons below to share.  All other rights reserved.  

Thursday, August 06, 2015

The Power of One Turnip Seed


One turnip seed, planted in rich soil, in a five gallon container, can grow to feed a family; if it is carefully nurtured. First, that little seed will send out tiny leaves. Those leaves will eventually grow large and plentiful enough that you won’t mind pinching a few to add to salads and soups. As summer fades into the cool part of the year, the plant will produce many leaves. Each leaf only lives a month or so. By watching them carefully and experimenting, you gradually learn when they are best for adding to salads (young and tender) and how long you can wait to use them as cooked greens. Your turnip plant will continue to produce leaves straight through winter and on into earliest parts of spring.  (This article was written in 2008, in California. Here in Pacific County, Washington, many veggies are prone to going dormant over the winter.  Be careful not to take too many leaves over the cold dark months.)

 
Turnip Greens


Once the days begin to grow longer, you will notice your turnip plant begin reaching upwards.  Tender and delicious buds will form, which can be snipped with a few tender leaves, and added to salads, stir fries, and soups. The more buds you snip, the more the plant will produce, so go ahead and snip as often as you like. When you tire of the buds, the plant will begin producing flowers, which are also edible. The flowers can be used to garnish bowls of soup or salad.

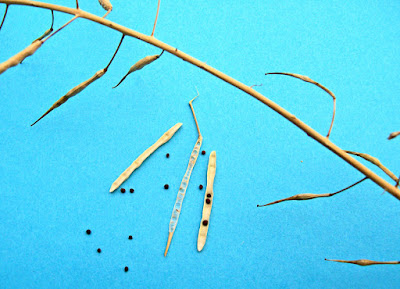
The flowers will be followed by tender turnip “beans.” The young edible seed pods are tasty, cooked or raw. They can even be pickled if you are feeling industrious. But be sure to let some of the seed pods mature. Because the seeds that will follow have even more promise, even more to give.

Mature seed pods are the color of straw, and the pop when squeezed, revealing a number of amber to nearly black, small, round seeds. Collect the stems with mature pods into a brown shopping bag and allow them to dry completely, away from irrigation and other moisture. Once dry, use your hands to crunch up the stems and pop the pods. Slowly remove each stem, popping any intact pods as you do. Then shake the bag to encourage the seeds to settle at the bottom.  You will have a mix of chaff from the seed pods and seeds in the bag. Reach into the bag with both hands, grab a handful of the chaff, and toss it back and forth to further encourage the seeds to fall. (The chaff and the stems make great additions to the compost pile or your garden’s layers of mulch.)


Turnip Seeds


When you get to the bottom of the bag you should have more turnip seeds than you really want to grow. Plant out a row or two, and save the rest of the seeds. You can pinch the young greens as you did with your single turnip, and you can also begin pulling tender young turnips in six to eight weeks. Turnips are excellent raw, roasted, mashed, fried, steamed, or boiled. Extra seeds can be shared with friends and family. (Or traded with other seed savers for seeds of other crops!)  They can also be grown and used just like alfalfa sprouts; and the dry seeds can be ground or used whole as a tangy mustard seed substitute.  

Turnips have been utilized as survival foods and as staples in many parts of the world when grain crops, trade, or transportation have been problematic. For fun, for variety, and for food security, consider planting a row of turnips in your garden this month. Don’t forget to save a seed to plant in a five gallon container, so you can demonstrate the power of one turnip seed.

~~~

Excerpted from:  Digging the Dirt / July in the Gardenfrom the article originally published in the Hoopa People Paper in 2008, Copyright Harvest McCampbell

~~~

I now live in Pacific County Washington, where I am currently the Growing Together Community Garden coordinator.  We are hand selecting mildew free turnips for seed saving!  


You can read a little about this effort on our Facebook page.   

Thanks for visiting!  Come back again! 

Wednesday, January 04, 2012

January in the Garden

January is traditionally the time of day dreaming and planning for gardeners young and old. Garden catalogs begin trickling in, tantalizing us with rediscovered heirlooms, as well as new and improved flowers and foods. Slowly we work through each catalog revising the list of everything we want, until we can be satisfied with what we really need, what we really have time and space for. But many a cold, rainy day is cheered with all the possibilities.

If you aren’t already inundated with gardening catalogs check out: http://www.mailordergardening.com/ You will find listings for more garden catalogs than you ever imagined. They are arranged by plant categories, such as trees, herbs and vegetables, bulbs, etc. When you click on the catalog name you are sent to a page that gives a description of the company as well as a link to their web site. Or you can simply jot down the phone numbers of the ones you think you would like and call to request a catalog. Parents and teachers will also want to check out their “Kids Garden” section. They have color pages, a game, and information on a small grant. If you don’t have Internet service, stop by our local library. Most libraries (including ours) now have public access computers available, and someone is usually available to give you a hand.

Planning for Peppers

Peppers do an outstanding job during our hot summers. However, our sometimes cool spring weather can get them off to a dismal start. They tend to be very slow growing when young; the cooler it is, the slower they grow. A little planning ahead will help you grow the best pepper crop ever. Peppers of all kinds can be started inside (in late January or early February) if you can provide a warm location and bright light. Peppers germinate best with soil temperatures between 75 and 80 degrees. You can get a good guestimate of indoor soil temperature by laying a room thermometer down on the surface where you will place your seeded six packs. It may take some experimenting to find the right location. You need the seeded six packs to stay warm at night, but not get over heated during the day when they are under lights. Many people resort to special heating mats made for starting seeds; others skip the seed starting step and purchase young plants ready to harden off and slip into the ground. If you want to grow your own peppers from seed, it is a good idea to find your spot or shop for a heating mat now. Most nurseries and garden catalogs keep them in stock, especially this time of year. Shop around; prices for exactly the same set up can vary greatly.

If you crave a rainbow of peppers in more variety than we usually find close to home, several catalogs come to mind. If you are interested in growing organic heirloom peppers, here are two great choices. Seeds of Change offers two pepper seedling collections—one of sweet peppers, the other of chile peppers, plus lots of choices in seeds. (888) 762-7333 / www.SeedsOfChange.com The Seed Savers Exchange offers seedlings of eight different heirlooms, two of which are hot, one mild, and the rest sweet. You can mix and match or order a sampler pack. And they have even more varieties as seed. (563) 382-5900 / www.SeedSavers.org If the latest hybrids are what you want; Burpee has in a dazzling variety, many available as seedlings or seeds. (800) 487-5530 / www.Burpee.com You can order on line from any of these companies, or call and request a catalog.

Once you get your seeds growing or your plants delivered, you will want to keep them in containers until all threat of frost has past. They will enjoy spending warm days outside, at first in the shade. Each day they should be exposed to more and more sun, until they are ready to stick their feet in the soil and thrive. Don’t forget to bring them in at night if it might get down to freezing. Save your peppers a sunny spot in the garden and they will reward you with a bountiful harvest.

Fresh Produce From the Garden

Winter’s crisp cold nights have an uncanny effect on many root vegetables, turning them sweeter than if they were grown in the summer. If you planted parsnips last spring; carrots, rutabagas, or turnips this fall—you can look forward to a special treat. Get out your shovel next time we get a break from the rain and use it to carefully loosen the soil around these delectable roots. Dig only as many as you will need for a few days; they will stay sweeter and fresher in the ground than they will in the fridge. You can use them in most any dish that comes to mind, such as home-made soups, casseroles, stir fries, or grated into salads. For a real treat try roasting up a batch of mixed veggies. Roasting brings out the flavors of fresh dug winter roots like nothing else. Whether you throw them in next to a pot roast or a nice fat hen; or if you just roast them up on their own.

Here is a technique that doesn’t require using parchment or any other fancy supplies. You can use a metal cookie sheet or a baking pan--whatever you happen to have on hand (and is safe for use under the broiler). Scrub up your veggies and cut them into pieces about two inches long by t an inch wide and a half inch thick. Brush your pan and the veggies with a thin coat of olive oil. (If you don’t have olive oil, use whatever vegetable oil you have on hand.) You can sprinkle them with a little salt and pepper or other seasoning if you like. Place your veggies in a single layer on your pan, and set your oven rack so the surface of the veggies will be about five inches from the heat. Turn the oven on to broil, and keep a close eye on the veggies. After about five minutes, as they begin to brown, you want to move them around on the pan so they don’t stick. Continue checking them every three to five minutes. As they develop a nice warm color, pull the pan from the oven, brush them with olive oil and flip them over. They will not all be ready to flip, nor will they all be ready to remove from the oven at the same time. But every time you turn or remove some, the rest can be shifted just a bit to keep them from sticking. If you don’t devour these delectable morsels as soon as they cool, you can serve them as a side dish; arrange them on lettuce or other greens, toss them with pasta, tuck them into a sandwich, or offer them as a finger food with a little dip.

However you serve them, the results are elegant. And it is so easy to prepare. It is best to stay in the kitchen for this job. You can use the time to toss a salad or set the table, you don’t want to let your poor roots get scorched.


Originally published by the Hoopa People Newspaper
Copyright 2007, Harvest McCampbell
https://www.facebook.com/harvest.mccampbell

Tuesday, October 03, 2006

Colorful Carrots


When we think of carrots, the color orange most commonly comes to mind. However, in the long history of human - carrot associations, this has not always been the case. Archeologists have found carrot seeds stored in ancient dwellings since Neolithic times. These ancient carrots had little resemblance to the carrots on our dinner plates today. They were very much like those wild white sweet roots that Native children are fond of foraging from fields and meadows. While sweet, these roots are fairly tough and most often completely white. It is assumed that Neolithic people gathered the wild roots for food and that the carrot seeds were also gathered for their medicinal and flavoring possibilities.

More recently but still long ago, in fact as long ago as five thousand years, folks in the Middle East began the first known intentional cultivation of carrots. They selected or developed some larger rooted purple carrots, as well as some bi-colored carrots that somewhat resembled the purple topped turnips that abound in markets and gardens today. These carrots spread through out the Middle East and Europe by as early 1000 AD. At this time carrots were still not the delectable vegetable we know today. While sweet and nutritious when young, they were fairly tough customers, and they had a tendency to grow woody and bitter as they aged.

By the tenth century AD yellow carrots were developed in Turkey, through careful selection. These new yellow carrots reached Holland by the fourteenth century. Within a couple hundred years the Dutch had selected out orange carrots that were well on their way to resembling the carrots that we know and love. (Meanwhile all this time, in South America the Indians had their own carrots – Arracacia, of which I can find very little information. The facts are intriguing, the plants are perennial, are grown much like potatoes, and each plant can produce up to 2 kilos of edible roots per year. Now, that is a bunch of carrots! But since I can’t find a source for seeds or plants, we will have to stick with growing these European carrots, for now.)

Fashions do change, in clothes and carrots. Things once considered old fashioned and out dated return as the new rage. A close look at some of the larger seed catalogs will uncover a glimpse of carrots in many colors. The historical colors of carrots, long out of vogue are back in force. And with them are some colors the ancients may have never imagined. Atomic Red and Purple Haze are some of the newest hot carrot colors. You can even buy Rainbow packets with tender sweet carrots ranging from white, through yellow, to pale shades of the more familiar orange. 


Over wintering colorful carrots from Growing Together Community Gardens, where you will find a little more info.

Carrots make an excellent fall and winter crop here in the Pacific North West.. If you get them started early enough, you can even grow them in areas that get substantial snow. Once the snow starts falling the carrots will stop growing. But they will start again as soon as it thaws out in spring, giving you an extra early crop. The rest of us can start our carrots pretty much any time of year, as long as we can provide them with plenty of water. However, carrots grown through the winter are extra fat, juicy, and sweet.

"After several frosts, plant starches become sugars. Carrots attain the sweet crunch of apples, and kale loses all hint of bitterness."  Fred Bahnson, Soil and Sacrament.
Purple topped carrots can get huge!  Learn more here.

When choosing a spot for your carrots, the very first consideration is gophers. If you have gophers in your yard or garden they are sure to eat your carrots before you do. And as the soil takes a bit of preparation for these deep rooted veggies, that is not my idea of a good deal. Carrots can be grown in containers, and that is especially fun to try if you have young children. An empty coffee or olive oil can - can be pressed into duty. Use a nail and a hammer to punch a few drainage holes in the bottom of your new designer pot. You can fill your pots with potting mix, or make your own. Start with a handful of garden soil, a handful of used coffee grounds if you have them around the house, a handful of sand if you can get it, and mix in a gallon or so of potting soil, screened compost, or leaf mould. It can be as simple as that.

If you want to grow more carrots than can be done in an assortment of containers, and gophers are problem, raised beds underlined with hardware cloth are the answer. Hardware cloth is a metal mesh material available at most hardware and garden supply centers. It is not cheap. It is available in 3’ wide rolls, and generally sells for upwards of $2.00 - $3.00 a foot by length. Make sure the hardware cloth you purchase is galvanized. The good news is that it lasts for many years.

Most raised beds are 3 feet wide by six feet long. When designing the beds make sure that the outside measurement of the frame is 3 feet, so you have plenty of space to securely tack your hardware cloth to the wood, preventing gophers access to the beds. For carrots it is a good idea to have beds at least 12 inches high, higher might be even better. I am happy with my 12” x 1” boards hammered together and screened on the bottom. They are simple, not too expensive, and they look just fine.

For growing carrots in raised beds you may want a planting mix that contains a good amount of sand - if you can get it, lots of organic matter, and a lesser amount of plain old mineral soil. A nice loose mix that will resist compaction is ideal. If you are going to make your own, screened compost or leaf mould makes a good starter, purchased sharp sand is ideal – but river sand will do, and a few shovels full of your own garden dirt makes a good addition. You can also purchase planting mix, if you like. Just ask the nursery what they would recommend.

Fill your beds loosely, water well to settle the soil, top off the beds and repeat and level as needed. You want your soil to settle to within 2 inches of the top of your raised beds. Beds or containers filled too high will loose soil to rain and watering, but those without enough soil will cramp the root development of your yummy and nutritious carrots. (If they weren’t so dang good, and good for you too, they really wouldn’t be worth the trouble. Nothing much taste sweeter than a fresh pulled carrot.)

Now you are ready for seeds. I would bet that almost all nurseries and garden sections of hardware stores stock at least a few varieties of carrot seed. You might even be able to find them at your favorite grocery store. But if you want to amaze friends and family with fat ones, skinny ones, long ones, and short ones, as well as red, white, and purple ones, you will probably have to hit the seed catalogs.

The two best catalogs I’ve found, as far as carrot selections go, are Johnny’s Selected Seeds and Thompson and Morgan. You can request a free catalog from both these companies. Johnny’s Selected Seeds is enough to make any gourmet gardener drool. They carry 17 different varieties of carrots, including all the fancy colors and shapes listed above. You can request a catalog by phone, 877-564-6697, or on the Internet: http://www.Johnnyseeds.com Thompson and Morgan offers a whopping 19 different varieties of carrots, and while some of them over lap with Johnny’s offerings, they both have some unique selections. You can contact Thompson and Morgan by phone, 800-274-7333, or on the Internet: http://www.Thompson-Morgan.com

When ordering or purchasing your seed, consider getting some scallions, shallots, or bunching onions too. Carrots inter-grown with any of these alliums are much less susceptible to carrot maggots, who can eat tunnels through these tasty roots. I have not had any problems with carrot maggots here in Hoopa, but I was occasionally bothered by them when I gardened down in the Sacramento area. Rotating your carrot plantings each year and soil solarization can help if carrot maggots get to be a problem.

If you still want to know more about carrots, check out the carrot museum: http://www.carrotmuseum.co.uk/ They have information on everything from carrot antifreeze to carrot quotes, great classroom and rainy day activities, and much, much more. 

Articles On Other Fall and Winter Veggies:
BroccoliFennelGiant Red Japanese Mustard, Kale, KohlrabiParsnips.  

Copyright 2006 Harvest McCampbell, from my column "Digging the Dirt," published in The Hoopa Valley People Newspaper, Sept. 12, 2006. Posted here with permission.

Updated with a quote, photos, and minor editing on 11.16.16.  Text and photos, copyright Harvest McCampbell.  Please feel free to share via the buttons below.  All other rights reserved.