Showing posts with label beneficial insects. Show all posts

Thursday, November 17, 2016

Beneficial Insects Love Irises!


Purple Iris, 2006, my Hoopa Garden.


Irises make an important contribution to the garden environment by attracting a variety of predatory ground beetles. The larva of these beetles live in the soil, where they consume slug eggs and slug larva.  


Dutch Iris, 2015, from Growing Together Community Gardens.


The key to putting ground beetle attracting Irises to work for you most effectively, is to plant just a few each of a large variety of Irises that bloom at different times, and spread them around the garden.  The longer you can keep the adult ground beetles happy, the more likely they will be to lay eggs in your soil.  Ground beetles also prefer soil rich in organic matter, with strategically placed sections of rotten limbs or other untreated wood, to use as daytime shelter and nursery areas for egg laying.  

Learn more about developing healthy organic matter rich soil and attracting beneficial insects by clicking on the 'labels' found directly under the share option buttons found beneath this post. 

~~~

Text and photos copyright 2016, Harvest McCampbell. Please feel free to use the buttons below to share.  All other rights reserved.

Saturday, November 12, 2016

Lemon Balm

Lemon Balm is a very adaptable ancient herb that is found in gardens everywhere!


It is in the mint family, as are many culinary and medicinal herbs. Many mint family plants go dormant over the winter in our area. In our garden, Lemon Balm is first to greet spring with new green leaves. Sometimes it even stays green and lush through most of the winter.

Lemon Balm has a pleasant mild lemony-mint flavor. It makes a great cup of tea, and the young tender leaves can also be added to all kinds of salads. It is sometimes used in spring rolls, stir fry, curry, and Thai dishes as well. Any recipe that calls for basil can be given a new taste sensation by substituting Lemon Balm.

Lemon Balm also has a long history of use in cosmetics and as a gentle medicinal plant. It is a great carbon fixer, and when mature produces lots of organic matter that us useful in making compost or adding to mulch.

In addition the flowers (which are inconspicuous) attract bees--especially mason bees--and other pollinators and beneficial insects as well.  Providing for and attracting pollinators and beneficial insects is part of the important and necessary work of every gardener.


Here are some links to everything you need to know to get started using Lemon Balm for tea, flavoring, cosmetics, or as a gentle herbal remedy:

If you have never made tea from fresh herbs before, check out this link: http://www.doityourself.com/stry/how-to-make-lemon-balm-tea

Tips for using Lemon Balm in cooking can be found here: http://www.lemonbalmcream.com/

Here are some great recipes to try: http://www.farmflavor.com/tag/lemon-balm/
/culinary_uses.html

You can treat yourself to a home spa day with a Lemon Balm bath and home made Lemon Balm toners and astringents: http://www.lemonbalm.org/lemon-balm-cosmetic-skin-care-uses/

If you want to explore its medicinal properties check out this link: http://umm.edu/health/medical/altmed/herb/lemon-balm

For more fun things to do with Lemon Balm see: https://thenerdyfarmwife.com/12-things-to-do-with-lemon-balm/


Lemon balm is easy to grow from seeds.  Plants can be found through local plant sales, nurseries, and on-line herb specialists.  Many gardeners receive their first plants from other gardeners and then pass along the offspring.  Lemon balm is a reliable self sower to the extent that some people consider it a pest.  If it gets pesky in your garden, cut it back to the ground about midway through its first flush of tiny flowers, before they set seed.  Mature clumps can also be divided with a shovel, to reduce their size and share with friends.


Most of the text posted here originally appeared on Growing Together Community Garden's Facebook Page, where I have been gardening for the last three years and where I have been the coordinator for the last 2 years.  

Please feel free to link, share, or pin, this or any content on my blog.  Repost or republish only with written permission.  Copyright 2015, text and photos, Harvest McCampbell, all rights reserved. 
 

Tuesday, August 11, 2015

Slug Control


When we find damage in our yards and gardens that resembles the poor rhubarb on the right, careful eyes are very likely to discover that the slugs are out of control.  

Organic slug control begins with nurturing the soil.  Soil may seem like an odd place to start a discussion on slug control, but the easiest way to control slugs over the long term is to invite slug predators to do the job for you.  Slugs are at their most vulnerable to predation as eggs in the soil and as tiny hatchlings that live for months beneath the soil surface.  To permanently reduce slug populations we need to think about our garden soil as a living and complex ecosystem.

 
E.O. Wilson, in the Nova DVD, Lord of the Ants waxes poetic about the soil beneath our feet.  He mentions that most people think of the surface they walk on as two dimensional.  However, he goes on to explain that soil is one of the most complex and most diverse environments on the planet.  In most natural undisturbed ecosystems this is still absolutely true.  But it may not be true in your garden, which Wilson was not considering.  

The soils were we garden have often been compacted, leveled, and groomed to death.  In addition, our gardening habits may work against the soil ecosystem.   Baring the soil to the sun causes oxidation of humus and death to most soil organisms.  Further, chemical fertilizers are toxic to most soil organisms and beneficial insects, and if your soil has ever been treated with pesticides or herbicides the soil environment has been further compromised, or possibly completely massacred. 

We can, however, turn the soil around.  This is important to slug control.  A complex living soil environment will nurture and protect the beneficial predatory insects which will happily devour slug eggs and young slugs.  By improving the soil environment, we also improve the productivity of our gardens.  That’s a double win, more productivity and less damage!

In building and nurturing living soil, we may find we need to expand our ideas of what appropriate soil care is, what we might want to dig in and bury, as well as what we think is appropriate to use as mulch.  To encourage a diverse soil environment, a diversity of organic matter needs to be incorporated into the soil.  This feeds and creates habitat for a self supporting web of life, which will help keep pests in balance and protect our gardens.
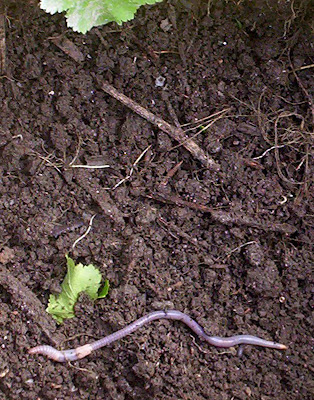
This photo is from a hole I dug in a bed in my Hoopa garden, to remove mature parsnips, garlic, potatoes, and giant snow drop bulbs.  It was about 12 inches deep, possibly a little more.  I didn’t work the soil after digging.  That's just what the bottom of the hole looked like.  And, by the way, I didn’t need a shovel, I just used my hands.  The important things to note are that there are different types and different sizes of organic matter present.  And the soil, even though it is moist, is a loose assortment of various sized crumbs.  This is your goal!  Soil that is crumbly, full of air spaces and organic matter of different types and sizes is exactly what plant roots need, exactly what the soil nutrient cycle needs, and exactly what the predatory insects that dine on slug eggs and slug hatchlings need as well.

You can achieve soil like this, easily, and without spending any money.  Everything you need is probably already produced in your garden and kitchen!   This technique is a variation on an old fashioned and little known British technique.  It is variously called garbage gardening or trash gardening, and it utilizes all kinds of organic matter.  In this technique, the garden row is prepared by trenching,  the trench is then filled with organic matter including kitchen waste, weeds, and other garden debris,  which is them buried under at least six inches of soil, and the resulting mini berm is then planted.  My modified version has been named “The Compost Hole Method” by my friends, and just uses planting holes instead of trenches.  Some of my friends have further adapted the technique to their gardens, environments, and resources.  At the community garden where I am now the coordinator, we have re-adapted the technique once again; using wide trenches and probably a full ton of weeds buried under eight inches of soil.  The two photos below show two different groups of tomato plants grown in the same garden, one over the trenched and buried weeds, and the other of tomatoes that were planted in our soil in an area that was tilled, top dressed, and then had finished compost worked into the planting holes.  The tomatoes on the left were grown over the buried weeds, the ones on the right by more traditional organic methods. The difference is amazing!


Burying your compostables including weeds, garden debris, and kitchen waste pays dividends, the very first season!

"Soil both craves life and wants to produce more life, even a hundred fold."  Fred Bahson, Soil and Sacrament, page 3.

Before we get going on the Compost Hole Method, which you can modify back as a method to prepare whole rows or to prepare wide beds, I want to share a little secret with you.  Amongst all the other organic matter you will utilize in building your living soil environment, you will want to include short sections of sticks and stalks. They are the secret ingredient for super powering organic slug control in your garden.  


Many of our garden plants produce strong stalks when we allow them to flower and begin the process of setting seed.  Clip the excess stalks into sections from about 2 – 4 inches long.  These carbon rich sticks provide plenty of surface area for beneficial bacteria, protozoa, mycelium, and other beneficial soil organisms to colonize, and the green plant matter that forms the skin and pith of the sticks (as well as the other organic matter you will be burying) provide the beneficial microorganisms with food.  As the sticks and stalks are colonized and broken down, they often become hollow.  

The combination of this hollow structure and the presence of beneficial organisms creates the perfect home and food source for the tiny soil living creatures that devour slug eggs and young slugs before they emerge from the soil.  These predators will arrive in your garden as eggs laid by their mothers.  They do not come out of their eggs big enough to slay slug eggs.  They need other smaller organisms to devour while they grow.  The hollow sticks, in addition to offering them an excellent food source, also provide them with shelter from larger predatory soil creatures.  Your soil is definitely going to be a jungle of tiny creatures.  But that’s the way it should be, and it will make your work so much easier!

In the post on Slimy Slugs, I mention creating a coarse mulch of clipped sticks.  This mulch of clipped sticks is important to mature slug predators, but now you also know how important it is to include some of these sticks in the soil itself.  An abundant garden will produce enough of this material to provide for both needs, however, it may take a few years of soil building to get to the point that you have enough sticks in production to do both.  If you don’t have a source of fresh sticks and stalks to clip, check out the straw offered for mulching and bedding at your local feed store.  Most straw is actually the leftover stalks from a variety of grain crops.  Look close at a bale, and you should see that it contains hollow tubular stems.  While these stems will decompose faster than most garden stalks will, they will serve you very well until you get an ample production of stalks from your own garden.    

Check the straw out before buying, to make sure it has fairly sturdy hollow stems.  You don’t want hay.  Hay decomposes too quickly, it has very few hollow stalks, and it is full of grain and weed seed that will sprout in your garden.  Be sure to clearly ask for straw and check it out before you purchase it.  Yes, yes, I know I did say that you could do this without spending money, and you can.  It will just take a little longer if you don’t now have fresh sticks and stalks to clip.  The fresh sticks and stalks are actually superior to straw, because they still have lots of juicy plant material that will feed beneficial microorganisms, and those microorganisms will be right inside the hollow tubes where the baby slug predators can eat them while they take shelter and grow.  Sticks and stalks are better.  Straw will help if you don’t have them.  If you don’t have money for straw, just plant extra of whatever you are growing, and let it bolt and flower—your garden can easily produce plenty of stalks in a season or two.  (Weed stalks work too!)

A couple of other sources of hollow sticks you might already have around your yard are butterfly bush and elderberry shrubs.  They both attract pollinators and beneficial insects, and elderberry has the additional benefit of producing berries that are edible and medicinal.  Once well established, both of these shrubs can withstand being cut back severely, and will generally regrow vigorously.  Once you’ve clipped your sticks, you might want to allow them to dry before burying them and using them or using them as a coarse mulch.  Sometimes those short clippings will sprout and root if you utilize them fresh.  That has never happened in my gardens, but I know of other gardens where it has happened.  Another alternative is to take your chances, and then pot any up that start to grow and share them with your gardening friends.  Fresh sticks are better than dried, but dried are better than none at all.  Meanwhile, you may have other plants that produce hollow stems, twigs, or sticks in your garden.  Give them your love, they deserve it!

Ok, let’s quit talking and get to work!  The first thing to do is build soil. We’ll start with The Compost Hole Method, and build some really fabulous living soil. Once your soil will provided a comfy nursery and larder for your slug eating predators, you will want to  attract their parents to your garden.  All you need to know is covered in the post on Slimy Slugs.

You are also going to want some help cleaning up the slugs the beneficial insects miss before they emerge from the soil.  Those mature slugs are the ones we hate the most after all.  Unless you live in the desert, toads and other amphibians are probably your best bet.  You will find lots of information here on creating amphibian habitat in your garden:  http://harvestsgardeningsecrets.blogspot.com/2010/11/hedging-for-amphibians.html 


If on the other hand, you live in a warm dry environment, you will want to create habitat for lizards and snakes.  Piles of rocks and downed wood, that have lots of protected and hidden spaces for hibernation, egg laying, and escape from predators are the ticket.  If you have a large garden, you will want to include this sort of reptile habitat in strategically located spots around your yard or garden.  Snakes prefer to enter their lair at the ground level.  Lizards generally like an elevated look out, say two to two and a half feet about ground level, with safe hidey holes directly below their look out. And since snakes will eat lizards, you might want to choose which creatures you want to attract to your garden and design with them in mind. In addition, all reptiles prefer their dens to be located in the sun, and to have flat areas for basking.   Think in terms of creating garden art as you create their habitat.  It doesn’t have to be a messy pile of unsightly rocks and downed wood.  It can totally be attractive, and it can include the odd whimsical element to make it fun for other sorts of garden visitors as well.

Speaking of other garden visitors, many species of birds also have a reputation for eating slugs.  While I have not ever personally found them particularly helpful in this regard, they do provide a wide range of pest reduction services.  Attracting birds for the purpose of getting them to eat pests is a little different than simply attracting them to feeders.  Learn more here: http://harvestsgardeningsecrets.blogspot.com/2012/01/mystery-in-garden.html

It is going to take a little time to get your garden environment productive and diverse enough to keep the slugs from over populating.  In the meantime I suspect you will be hand picking, just like me.  I am gardening in a new location and still have lots of work and planning to do!  I use a plastic bag as a glove when hand hunting slugs, and I stash them in a jar with a tight lid. While I forgot to leave any head room in the half gallon jar pictured below (don’t forget!),  I filled it with slugs in about a half hour.  Ugh!  Left in the sun for the day, the slugs were dead the next morning.  I promptly buried them for their nitrogen boost to the soil and to garden plants.  When you do this, don’t let them age in the jar, they create a terrible stink; but when buried the soil forms a filter and the microorganisms make quick work of the rest, there’s no smell at all once they are buried.  (Quick tip, dig your hole before you open the jar!)   

Beware!  Slugs can carry disease.  Before you try this, contact your health department or cooperative agricultural extension and ask if slug borne meningitis is a problem in your area.  If it is, just get yourself a couple of plastic bags that have no holes, use one as a glove to collect the slugs, and the other as a receptacle.  When you’re done, knot the bag closed with the slugs inside, and stash it and the ‘glove’ in the trash.  And be sure to wash your hands!  Slug slime is gross!  Oh, but slug slim is actually good for the soil.  It helps the soil form that very desirable crumb texture and the beneficial soil microorganisms love it.  Slugs are not all bad.  But an over population of slugs is terrible. 

We are beginning to learn to think of the garden as an ecosystem, where all things exist in balance.  The role of the gardener is to steward that balance and in return to be deeply nourished . . .

Questions?  Additional organic slug control tips?  Please leave a comment!

~~~

Text and photos copyright Harvest McCampbell, 2015.  Updated 11.20.2016 with a quote and minor edits.   Please feel free to use the buttons below to e-mail, re-blog, tweet, share, or pin this post.  All other rights reserved.

Monday, August 04, 2014

Ox Eye Daisy, Cheerful, Useful, and Instructive!


The ox eye daisy is a common field and roadside wild flower here in the Pacific North West.  It also makes a lovely carefree addition to garden borders, where it attracts beneficial insects and offers nectar to our very important pollinators.  


It is reported as being a European immigrant and sometimes as invasive.  However, just because a plant that is considered an alien naturalizes itself into a niche in the environment, does not mean it should be considered invasive or even unwanted.  

Before considering a plant invasive, ask yourself a few questions:
1.  Does it provide pollen and nectar or other food to important pollinators or native animals?
2. Does it provide ecosystem benefits; such as stabilizing slopes, slowing erosion, building top soil, providing animal habitat, or reducing human and domestic animal impacts to the land?
3.  Does it increase or decrease the genetic diversity of an area?
4.  Is it useful to people for food, medicine, or utility and does it grow where they can access it?
5.  Is it crowding out rare or endangered plants or animals?

Let’s apply these questions to our ox eye daisies:
1. Yes it provides nectar to pollinators and pollen to beneficial insects, as well as seeds to birds later in the season.
 2. Yes, it provides ecosystem benefits, in that it is often found growing on disturbed slopes, where it helps stabilize the soil and reduces erosion.
3. Simply by its presence it increases the genetic diversity by one, the insects and birds that depend on it may also help increase the genetic diversity of the area.
4. Yes, it is useful to people as food, medicine (see links below), and for attracting pollinators and beneficial insects to the garden and to foraging areas.
5.  Probably not, but if so, and someone is committed to tending the threatened native plants, the ox eye daisies should be weeded out with as little physical and chemical disruption to the area as possible.
 
When we really stop to think about it, many of the plants that are targeted with eradication as aliens or invasive may be better off ignored, or even embraced, used, and celebrated.  The eradication activities are often more harmful to the environment than the plants that are removed. In addition, unfortunately, known endemic plants are often targeted as 'invasive,' by people who have not done their research and make unfounded assumptions.  For more words of caution regarding being overly quick to judge and destroy plants that are considered alien, as well as a discussion about who profits from their eradication, please see:  http://www.jlhudsonseeds.net/NativesVsExotics.htm

Many plants that were once considered alien and invasive have turned out to be indigenous.  We owe this knowledge to the botanical archaeology conducted on fire pits and midden mounds, as well as cores taken on lake bed sediments.  There is no definitive list of all the plants that were here in North America before contact.  However, a truly invasive plant is often easy to recognize. A truly invasive plant quickly crowds out other plants and reduces diversity, over a season or over a number of years.  And it does it, right before your eyes.  Plants that quickly colonize soil that has been bared for any reason, such as mud or landslides, floods, or fires; even plants those plants that form near monocultures on hillsides or meadows are not necessarily invasive or alien plants.  Be sure to do your homework before you undertake or participate in any plant eradication efforts.
 
Back to our cheerful ox eyes, I’ve never done more than taste these daisies, so I am not an expert on their use or identification.  Not all daisies are edible, and some are actually insecticidal and may be toxic to people too.  Always be very sure of your identification of any unfamiliar plant, and study up on the toxic and poisonous plants in your area, so you know what to be cautions of.

Here are some links to more information on edible, medicinal, and historic uses of ox eye daisies:

~~~

Comments, questions, tips are always welcome.  If you find typos or broken links please leave a comment and I will fix it up as soon as I can!

~~~

If you are interested in herbs and haven’t read my books yet, your local librarian or bookstore if they can order them for you!   More information can be found here:  https://www.goodreads.com/author/list/429832.Harvest_McCampbell
 
~~~

Updated 10.30.15

~~~

Copyright 2014, 2015; all rights reserved.  Republishing by permission only.  Sharing on the other hand is most welcome.

~~~

Share:  the buttons below can be used to e-mail, reblog, tweet, share, pin, or recommend on google:

Tuesday, September 11, 2012

Arugula!


In all my years of garden writing, I am very surprised to discover that I have never written about arugula, which is one of my favorite greens.  This very tasty cool season vegetable has a unique spicy flavor all its own, which can vary greatly from strain to strain.  My hand selected arugula is my favorite, of course.  That is one of the pleasures of saving seeds—you only save the ones that perform to your personal standards!

My arugula has a flavor that is reminiscent of a combination of mild mustard and radish greens, with a tad of cilantro, sesame seed, and black pepper thrown in.  Arugula is a member of the mustard family.  It has a bold robust flavor that makes a lovely accompaniment to sandwiches, salads, and any dish to which you would add cooked greens.  While I am singing the praises of my own hand selected strain, you might want to know that arugula is actually an ancient plant.  It has been grown in the Mediterranean region since Roman times, when it was considered an aphrodisiac!

I don’t know about that, but all parts are edible!  Arugula finds its way to the plate as sprouts, micro greens, baby leaves, full sized leaves, tender young bolts, flower buds, flowers, and immature seed pods.  The fully mature seeds taste very similar to the leaves, just more so.  They can be ground or used whole, just as you would pepper or mustard, for a taste sensation all their own.

Arugula is as easy to grow as common radishes!  It is not very particular about the temperature of the soil at planting time, and you can start them in containers or directly in the garden--if it’s safe from seed eating birds and seedling eating pests.  If starting seeds directly in your garden is not possible, don’t feel alone. I am in the same boat!  To see my latest experiment on producing healthy seedlings see:  Starting Seed, If At First You Don’t Succeed.’ 

Arugula seedlings can be started now for fall and winter production, and they can help you fill out your year around gardening plan. They not only can take a frost, they will survive occasional snow fall and ground freezing.  If your yard grows weeds in winter, you can grow arugula!  the farther north you go the more important full sun becomes, but here in Central California they do just fine with half a day of sun or even bright filtered shade.  If your soil stays frozen or covered in snow for most of the winter, you can still squeeze in a fall and early spring crop, and you might try over wintering a pot on a sunny enclosed porch or balcony.

The seeds should be planted about ¼ inch deep, kept in bright sunlight and as evenly moist as possible until the plants are well established.  The seeds will generally start germinating in 6 – 12 days.   If you work away from home, keeping the seedlings evenly moist while providing bright light can be challenging.  Check at your local nursery or in your favorite catalog for self watering systems that use wicks or moisture mats.  You can also skip germinating your own and look for six packs of arugula starts are your local farmers’ market!   However, there is nothing quite so satisfying as starting your own seed.

Here is what they look like when they first come up:


If, instead of looking like the babies in the photo above, they look like these in the photo below, you know they are not getting enough light:


Once your seedlings are about 6 weeks old, you can start pinching leaves for sandwiches and salads:


 By the end of winter, through spring, and possibly into the early summer--your plants will produce attractive tasty flowers that make a wonderful addition to green salads.  The flowers have the added benefit of attracting beneficial insects and providing food for our all important pollinators:


Arugula seeds are available from most well stocked seed counters and seed catalogs that carry specialty vegetables.  If you would like to try a few seeds saved from my plants, I can offer them through Listia auctions.  Listia is an on-line bartering platform.  It's free, it works on points (called credits) and you can earn these credits a number of ways (by listing your own auctions or by taking surveys--for instance).  But if eBay works better for you, just let me know.  If you have any question, please feel free to leave them in comments section below.

Here is a link to join Listia that fixes you up with some free credits:  https://www.listia.com/signup/.   Once you are a member you can check out my auctions here: http://www.listia.com/profile/1729366.  If I do not currently have an auction for arugula seeds listed, please feel free to contact me about your interest and I would be happy to put an auction up for you if I still have seeds available. (And again, I can put one up on eBay if that works better for you.)


For more on starting seeds see:


For more cool season crops see:


Thanks for stopping by my blog!  Please remember that all text and photos are my copyrighted intellectual property.  Please feel free to share with the buttons below or to post links, but please do not repost or publish without contacting me first.  The best way to contact me is to leave a comment below, my e-mail accounts are so bogged down that I never manage to open all my mail.