Showing posts with label cool season vegetables. Show all posts

Saturday, April 14, 2018

Milk Thistle Salad!

Milk Thistle seeds are famous as a liver tonic and Milk Thistle flowers are famous as a tea for new mothers, but did you know that young Milk Thistle leaves are fabulous in a salad?

You do need gloves and clippers to collect them, and a good set of kitchen shears to remove the prickles along the leaves edge. They look absolutely dashing in a salad of mostly dark or pale greens. They have mild yet robust sweet nutty flavor, and if picked in the morning and then kept slightly moist and refrigerated until served for lunch or dinner, they are delightfully crisp. 

Yes, they are a bit of work, but in the early spring, most anything from the garden, the fields, or the forest is welcome. Please be careful to not gather where anyone may be spraying pesticide or there is a chance of industrial pollution.

My photo from 4.7.2004, moist riparian alder woods along Mill Creek in Hoopa CA. I can still smell those woods across the years and miles.  


Individual milk thistle plants can grow to be 4 - 5 feet tall and wide, with leaves nearly 3 feet long, when they are really happy.  And it is sometimes found in large stands.  I can take full sun to deep shade.  Pictured is a baby growing in deep shade, about  a foot a cross, max and only a few inches tall. 

If you have any questions or tips you would like to share, please feel free to leave them in the comments section.  All comments are moderated, and right now I seem to be locked out of admin for my own blog.  But at least I can post, which I had been locked out of for a while.

Text and photo copyright 2018, Harvest McCampbell, all rights reserved.  May be used in print based, audio, or video media with written permission only.  harvest95546 @ yahoo.com

Please feel free to e-mail, blog, tweet, share, or pin using the buttons below.  

Thursday, January 12, 2017

January in the Garden


January is traditionally the time of day dreaming and planning for gardeners young and old.  Garden catalogs begin trickling in, tantalizing us with rediscovered heirlooms as well as new and improved flowers and foods.  Slowly we work through each catalog revising the list of everything we want, until we can be satisfied with what we really need and what we really have time and space for.  But many a cold, rainy day is cheered with all the possibilities.  

If you aren’t already inundated with gardening catalogs check out this blog post from ‘The Garden Glove’ on the Top 12 Garden Seed Catalogs:   <http://www.thegardenglove.com/top-garden-seed-catalogs/ >.  It contains most of my favorites, many of which are free on request.  When you click on a catalog name you are sent to their web site.  Most seed companies feature a link to a page where you can request a free copy of their catalog right on their home page.  If you don’t have Internet service, stop by one of our local libraries. Most libraries (including ours) have public access computers available, and someone is usually available to give you a hand or help you sign up for a class or a tutor.


Planing for Peppers

Believe it or not, now is the time to plan for peppers.  Peppers do an outstanding job when our summers are hot.  However, our cool spring weather can get them off to a dismal start. They tend to be very slow growing when young; the cooler it is, the slower they grow.  A little planning ahead will help you grow the best pepper crop ever.  Peppers of all kinds can be started inside (in late January or early February) if you can provide a warm location and bright light. Peppers germinate best with soil temperatures between 75 and 80 degrees. You can get a good guestimate of indoor soil temperature by laying a room thermometer down on the surface where you will place your seeded six packs. It may take some experimenting to find the right location. You need the seeded six packs to stay warm at night, but not get over heated during the day when they are under lights. Many people resort to special heating mats made for starting seeds; others skip the seed starting step and purchase young plants ready to harden off and slip into the ground.  If you want to grow your own peppers from seed, it is a good idea to find your spot or shop for a heating mat now. Most nurseries and garden catalogs keep them in stock, especially this time of year. Shop around; prices for exactly the same set up can vary greatly.

In January our minds are on catalogs, even when thinking of peppers. If you are interested in growing organic heirloom peppers, The Seed Savers Exchange has a great catalog.  Seed Savers offers seedlings of eight different heirlooms, three of which are hot, with the rest being mild or sweet.  You can mix and match or order a sampler pack.  And they have an amazing variety, nearly 50 different kinds of peppers, available as seed. (563) 382-5900 / <www.SeedSavers.org>.  If the latest hybrids are what you want; Burpee has in a dazzling variety, many available as seedlings or seeds.  (800) 487-5530 / <www.Burpee.com>.  If you are hoping for peppers even if next summer is cool, then you should visit Territorial Seeds. They have an awesome selection of both seeds and plants that have been proven to do well in the Pacific North West. 800-626-0866 / <http://www.territorialseed.com/>. You can request a catalog on-line or by from any of these companies.

Once you get your seeds growing or your plants delivered, you will want to keep them in containers until all threat of frost has past.  They will enjoy spending warm days outside, at first in the shade.  Each day they should be exposed to more and more sun, until they are ready to stick their feet in the soil and thrive.  Don’t forget to bring them in at night if it might get down close to freezing.  Save your peppers a sunny spot in the garden and they will reward you with a bountiful harvest.


Fresh Produce From the Garden

Winter’s crisp cold nights have an uncanny effect on many root vegetables, turning them sweeter than if they were grown in the summer. If you planted parsnips last spring; carrots, rutabagas, or turnips this fall—you can look forward to a special treat. Get out your shovel next time we get a break from the rain and use it to carefully loosen the soil around these delectable roots.  Dig only as many as you will need for a few days; they will stay sweeter and fresher in the ground than they will in the fridge.  You can use them in most any dish that comes to mind, such as home-made soups, casseroles, stir fries, or grated into salads.  For a real treat try roasting up a batch of mixed veggies. Roasting brings out the flavors of fresh dug winter roots like nothing else can, whether you throw them in next to a pot roast or a nice fat hen; or if you just roast them up on their own. 

Here is a veggie roasting technique that doesn’t require using parchment or any other fancy supplies. You can use a metal cookie sheet or a baking pan--whatever you happen to have on hand (and is safe for use under the broiler). Scrub up your veggies and cut them into pieces about two inches long by an inch wide and a half inch thick. Brush your pan and the veggies with a thin coat of olive oil. (If you don’t have olive oil, use whatever you have on hand.)  You can sprinkle them with a little salt and pepper or other seasoning if you like. Place your veggies in a single layer on your pan, and set your oven rack so the surface of the veggies will be about five inches from the heat.  Turn the oven on to broil, and keep a close eye on the veggies.  After about five minutes, as they begin to brown, you want to move them around on the pan so they don’t stick.  Continue checking them every three to five minutes. As they develop a nice warm color, pull the pan from the oven, brush their tops with oil and flip them over.  They won’t all be ready to flip, nor will they all be ready to remove from the oven at the same time.  But every time you turn or remove some, the rest can be shifted just a bit to keep them from sticking.  If you don’t devour these delectable morsels as soon as they cool, you can serve them as a side dish; arrange them on lettuce or other greens, toss them with pasta, tuck them into a sandwich, or offer them as a finger food with a little dip.  

However you serve them, the results are elegant. And it is so easy to prepare.  It is best to stay in the kitchen while they cook, because you don’t want to let your poor roots get scorched.  You can use the time to toss a salad or set the table.  It’s fun and it’s yum!

~~~

Published by the Willapa Harbor Herald, December 4th, 2017.  Posted here with permission.

A previous version was previously published by the Hoopa People News, in 2007.

Copyright 2017,  Harvest McCampbell.  Please feel free to use the buttons below to share.  All other rights reserved.  

Sunday, November 13, 2016

Red Veined Sorrel


Red Veined Sorrel is easy, beautiful, and edible too!


This showy sorrel is often grown as an ornamental, however it is totally edible cooked or raw. The younger leaves are tender, and in certain seasons they are choice; however it is always wise to give them the taste test if you are hoping to use the lovely leaves in a salad, because they have a tendency to become strong flavored and slightly bitter. Simmering or braising does tenderize them and sweeten them up. In addition to using them in salads and as a garnish, they are great added to soups and as part of the mix in an old fashioned 'mess of greens.'


Red Veined Sorrel from Growing Together Community Gardens.

Red Veined Sorrel is easy to grow and plants and seeds are often available at nurseries, garden centers, and through mail order catalogs and on-line sellers. They are offered under a number of different names, including red sorrel, blood sorrel, and unicorn plant.  Once established they will return each year and their clumps will slowly increase in size and they can be divided to share with friends or to get them established in a few spots in the garden.

When you notice that they start shooting up tall stems, you will want to cut them back to the ground. They are vigorous self sowers and those tall stems are getting ready to make thousands of seeds!  A few of these striking plants are often welcome in the garden, but thousands are definitely too many!

~~~

This post started out as a photo description on Growing Together Community Gardens' page, where I have gardened for the last 3 years, and where I have been the coordinator for the past 2 years.

~~~ 

Copyright, 2016, Harvest McCampbell.  Please feel free to share using the buttons below.  All other rights reserved.

Thursday, August 06, 2015

The Power of One Turnip Seed


One turnip seed, planted in rich soil, in a five gallon container, can grow to feed a family; if it is carefully nurtured. First, that little seed will send out tiny leaves. Those leaves will eventually grow large and plentiful enough that you won’t mind pinching a few to add to salads and soups. As summer fades into the cool part of the year, the plant will produce many leaves. Each leaf only lives a month or so. By watching them carefully and experimenting, you gradually learn when they are best for adding to salads (young and tender) and how long you can wait to use them as cooked greens. Your turnip plant will continue to produce leaves straight through winter and on into earliest parts of spring.  (This article was written in 2008, in California. Here in Pacific County, Washington, many veggies are prone to going dormant over the winter.  Be careful not to take too many leaves over the cold dark months.)

 
Turnip Greens


Once the days begin to grow longer, you will notice your turnip plant begin reaching upwards.  Tender and delicious buds will form, which can be snipped with a few tender leaves, and added to salads, stir fries, and soups. The more buds you snip, the more the plant will produce, so go ahead and snip as often as you like. When you tire of the buds, the plant will begin producing flowers, which are also edible. The flowers can be used to garnish bowls of soup or salad.

The flowers will be followed by tender turnip “beans.” The young edible seed pods are tasty, cooked or raw. They can even be pickled if you are feeling industrious. But be sure to let some of the seed pods mature. Because the seeds that will follow have even more promise, even more to give.

Mature seed pods are the color of straw, and the pop when squeezed, revealing a number of amber to nearly black, small, round seeds. Collect the stems with mature pods into a brown shopping bag and allow them to dry completely, away from irrigation and other moisture. Once dry, use your hands to crunch up the stems and pop the pods. Slowly remove each stem, popping any intact pods as you do. Then shake the bag to encourage the seeds to settle at the bottom.  You will have a mix of chaff from the seed pods and seeds in the bag. Reach into the bag with both hands, grab a handful of the chaff, and toss it back and forth to further encourage the seeds to fall. (The chaff and the stems make great additions to the compost pile or your garden’s layers of mulch.)


Turnip Seeds


When you get to the bottom of the bag you should have more turnip seeds than you really want to grow. Plant out a row or two, and save the rest of the seeds. You can pinch the young greens as you did with your single turnip, and you can also begin pulling tender young turnips in six to eight weeks. Turnips are excellent raw, roasted, mashed, fried, steamed, or boiled. Extra seeds can be shared with friends and family. (Or traded with other seed savers for seeds of other crops!)  They can also be grown and used just like alfalfa sprouts; and the dry seeds can be ground or used whole as a tangy mustard seed substitute.  

Turnips have been utilized as survival foods and as staples in many parts of the world when grain crops, trade, or transportation have been problematic. For fun, for variety, and for food security, consider planting a row of turnips in your garden this month. Don’t forget to save a seed to plant in a five gallon container, so you can demonstrate the power of one turnip seed.

~~~

Excerpted from:  Digging the Dirt / July in the Gardenfrom the article originally published in the Hoopa People Paper in 2008, Copyright Harvest McCampbell

~~~

I now live in Pacific County Washington, where I am currently the Growing Together Community Garden coordinator.  We are hand selecting mildew free turnips for seed saving!  


You can read a little about this effort on our Facebook page.   

Thanks for visiting!  Come back again! 

Friday, December 19, 2014

Better than Pesto


Fresh Italian Seasoning Concentrate!

Last fall I put fresh tender sprigs of rosemary, sage, oregano, tarragon, and parsley into the food processor and ground them up.  (A mortar and pestle would word too.)  I then added salt and pro-biotic vinegar.  (I make my own, but raw apple cider vinegar with live culture would work as well, or even fresh whey from home fermented yogurt cheese.)  I can't give you measurements, because I just did it to taste. 

Next I jarred it up in those tiny 4oz jelly jars they sell in the canning supplies section of country markets.  (You can also order on-line.)  And from there it went into the freezer. 

Now when ever I want that savory taste of summer I pop a jar out of the freezer, and mix a little into a serving of rice or soup.  A little bit goes a long way!  One of my favorite no-gluten treats is to take an organic Lundberg Family Farms rice cake, spread it with a tad of Wilderness Family Naturals organic mayo, spread rounded teaspoon of my 'Italian Seasoning Pesto Concentrate' on top of that--which is really awesome all by itself.  But sometimes, like now, some thin sliced organic Colby cheese from Horizon Organic's is exactly what I crave for the perfect topping!

Reproduce this idea next spring or fall, or even think about what's out in the garden now.  In my garden, the parsley is still doing well, as is rosemary and oregano, and a number of kinds of cress and mustard.  The fennel is also trying to make a comeback, and wasabi arugula has self sown a nice little patch that will be ready to harvest soon.  Have fun with what you have on hand and if you have plenty--freeze some up for the next season as well!

~~~

A little note from me . . . .  I have been fairly absent from this blog, as any of my few followers have surely noticed.  I am still blogging, however, my focus is Boycott for Peace.  However, I still love the garden and the really good food that gardens provide.

~~~

Boycott for Peace!
http://boycott4peace.blogspot.com/
https://www.facebook.com/boycott4peace

~~~

E-mail, reblog, tweet, share, or pin, using the buttons below:

Monday, September 24, 2012

Grandma Dana’s Red Chard


Chard selections can vary from thick succulent leaves to very delicate thin leaved specimens.  They can boast bold leaves up to 18 inches long, much smaller leaves reminiscent of dwarf spinach, and their flavor can range for a stout, bold chard tang to a delicate and refined flavor to please the most discriminating of palates.   Hand selecting seeds in your own garden is a great way to get the red chard your heart desires.
Grandma Dana’s Red Chard has much to recommend it.  When young, it is a compact plant that minds its manners in the garden.  It would be ideal for small spaces or containers.  The leaves reach to about 8 inches, and are right in the middle of thickness and flavor for the range of what chard can offer.  Not too strong, not too wimpy, just about perfect!  In addition it is tolerant of frost, and of recurrent ground freezing and thawing.  Here in my yard it proved hardy down to 10F and produced through the winter on about 4 hours of direct sun.  And it proved to be fairly drought tolerant through a dryish winter and spring.  

In late spring, it outdid itself with flowering and later with seed production.  While the flowers were no showier than other chards, the stalk shot up about four feet—with side branches reaching 18 inches in every direction.  And the fragrance?  On My!  Beets and chard are very closely related, and there are beet varieties that grown purely for the fragrance of their pollen, which is used in perfumery.  This chard smells so sweet, so complex, so wholesome -- am thinking I will plant it beneath every window, just for the fragrance alone!  To top it all off, it is just as colorful as any other red chard selection, and that winter shot of red in the garden is a joy to behold.  

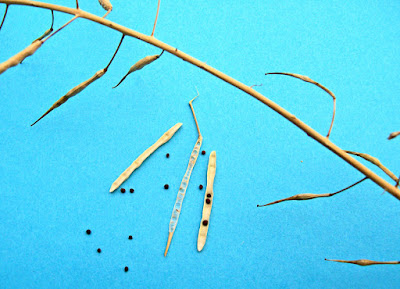
I have saved a pint of seeds so far, with another pint tossed around the yard at random, and there is probably another pint of immature seeds on the plant.  In my little germination test, the seeds all sprouted in seven days,  with each “seed” producing between two and six seedlings.  (Chard “seeds” are actually multi-seeded fruits.)
 

Grandma Dana's Red Chard two weeks after planting.

This fabulous germination was under very adverse soil temperature conditions.  Over night the soil sometimes got down to 40F degrees and during the day it was occasionally as high as 100F.  They are very adapted to a broad temperature difference between night and day!  The copious seed production and the quick uniform germination makes Grandma Dana’s Red Chard ideal for micro green and baby leaf production, in addition to the vegetative stage being well adapted for small gardens and containers.

I can offer full tablespoons of Grandma Dana’s Red Chard through either Listia or eBay, to anyone who would like to try it in their own garden or small farm, for chard breeding purposes, or for those who would like to grow it out for small scale commercial seed production.   


This offer is likely only good until this year’s seeds run out.  I actually have a different strain of red chard that I personally hand selected, which I am planning on growing out this year.  If it survives to flower, (my seeds are old) I will keep it isolated from Grandma Dana’s chard for the first season, so I can offer untainted seeds of my own strain, but after that I intend to let them cross.  So, if you want seeds of this strain, be sure to contact me via comments or Listia.  If I don’t already have an auction set up (and if I still have seeds available) I will set up an auction at your request.

Once you have your seeds (no matter what seeds you are working with) plant them between ¼ and ½ inch deep in rich potting soil, keep them evenly moist and in bright light.  If your winter time temperatures go much below ten degrees, save some of your seed to start a second crop for early spring. If you want single seedlings for cell packs—start them in a sandy mix, and prick individual seedlings apart once the clusters have germinated, and then replant in good a rich potting mix.  Seedlings will need direct sun in the morning and in the late afternoon, at the very least, to keep from getting leggy.  When your seedlings are big enough to safely plant out in the garden, choose a spot where they will get at least 4 hours of direct sun a day.  

Young chard leaves and micro greens are good in salads, older leaves can be chopped and briefly steamed, sautéed, or braised for a colorful, tasty, and healthy side dish.  They can be added to soups and casseroles, omelets and soufflés, and included in any recipe that calls for greens of any kind. Bumper crops of chard can be dried, frozen, canned, or made into the most amazing sauerkraut you ever had.  Consult Joy of Cooking or any other good down-home cook book for recipes and instructions.

If you want to share tips or recipes, or if you have questions; either about obtaining seeds or about growing or using chard—please feel free to leave a comment!

Here are the same seedlings from above at five weeks from planting, with no fertilizer!  If I were growing micro-greens they would be ready to harvest!
 
Photos and text Copyright 2012, Harvest McCampbell all rights reserved.  Please feel free to share using the buttons below or to post links.  Please contact me before reposting or publishing.