Showing posts with label full sun. Show all posts

Thursday, January 12, 2017

January in the Garden


January is traditionally the time of day dreaming and planning for gardeners young and old.  Garden catalogs begin trickling in, tantalizing us with rediscovered heirlooms as well as new and improved flowers and foods.  Slowly we work through each catalog revising the list of everything we want, until we can be satisfied with what we really need and what we really have time and space for.  But many a cold, rainy day is cheered with all the possibilities.  

If you aren’t already inundated with gardening catalogs check out this blog post from ‘The Garden Glove’ on the Top 12 Garden Seed Catalogs:   <http://www.thegardenglove.com/top-garden-seed-catalogs/ >.  It contains most of my favorites, many of which are free on request.  When you click on a catalog name you are sent to their web site.  Most seed companies feature a link to a page where you can request a free copy of their catalog right on their home page.  If you don’t have Internet service, stop by one of our local libraries. Most libraries (including ours) have public access computers available, and someone is usually available to give you a hand or help you sign up for a class or a tutor.


Planing for Peppers

Believe it or not, now is the time to plan for peppers.  Peppers do an outstanding job when our summers are hot.  However, our cool spring weather can get them off to a dismal start. They tend to be very slow growing when young; the cooler it is, the slower they grow.  A little planning ahead will help you grow the best pepper crop ever.  Peppers of all kinds can be started inside (in late January or early February) if you can provide a warm location and bright light. Peppers germinate best with soil temperatures between 75 and 80 degrees. You can get a good guestimate of indoor soil temperature by laying a room thermometer down on the surface where you will place your seeded six packs. It may take some experimenting to find the right location. You need the seeded six packs to stay warm at night, but not get over heated during the day when they are under lights. Many people resort to special heating mats made for starting seeds; others skip the seed starting step and purchase young plants ready to harden off and slip into the ground.  If you want to grow your own peppers from seed, it is a good idea to find your spot or shop for a heating mat now. Most nurseries and garden catalogs keep them in stock, especially this time of year. Shop around; prices for exactly the same set up can vary greatly.

In January our minds are on catalogs, even when thinking of peppers. If you are interested in growing organic heirloom peppers, The Seed Savers Exchange has a great catalog.  Seed Savers offers seedlings of eight different heirlooms, three of which are hot, with the rest being mild or sweet.  You can mix and match or order a sampler pack.  And they have an amazing variety, nearly 50 different kinds of peppers, available as seed. (563) 382-5900 / <www.SeedSavers.org>.  If the latest hybrids are what you want; Burpee has in a dazzling variety, many available as seedlings or seeds.  (800) 487-5530 / <www.Burpee.com>.  If you are hoping for peppers even if next summer is cool, then you should visit Territorial Seeds. They have an awesome selection of both seeds and plants that have been proven to do well in the Pacific North West. 800-626-0866 / <http://www.territorialseed.com/>. You can request a catalog on-line or by from any of these companies.

Once you get your seeds growing or your plants delivered, you will want to keep them in containers until all threat of frost has past.  They will enjoy spending warm days outside, at first in the shade.  Each day they should be exposed to more and more sun, until they are ready to stick their feet in the soil and thrive.  Don’t forget to bring them in at night if it might get down close to freezing.  Save your peppers a sunny spot in the garden and they will reward you with a bountiful harvest.


Fresh Produce From the Garden

Winter’s crisp cold nights have an uncanny effect on many root vegetables, turning them sweeter than if they were grown in the summer. If you planted parsnips last spring; carrots, rutabagas, or turnips this fall—you can look forward to a special treat. Get out your shovel next time we get a break from the rain and use it to carefully loosen the soil around these delectable roots.  Dig only as many as you will need for a few days; they will stay sweeter and fresher in the ground than they will in the fridge.  You can use them in most any dish that comes to mind, such as home-made soups, casseroles, stir fries, or grated into salads.  For a real treat try roasting up a batch of mixed veggies. Roasting brings out the flavors of fresh dug winter roots like nothing else can, whether you throw them in next to a pot roast or a nice fat hen; or if you just roast them up on their own. 

Here is a veggie roasting technique that doesn’t require using parchment or any other fancy supplies. You can use a metal cookie sheet or a baking pan--whatever you happen to have on hand (and is safe for use under the broiler). Scrub up your veggies and cut them into pieces about two inches long by an inch wide and a half inch thick. Brush your pan and the veggies with a thin coat of olive oil. (If you don’t have olive oil, use whatever you have on hand.)  You can sprinkle them with a little salt and pepper or other seasoning if you like. Place your veggies in a single layer on your pan, and set your oven rack so the surface of the veggies will be about five inches from the heat.  Turn the oven on to broil, and keep a close eye on the veggies.  After about five minutes, as they begin to brown, you want to move them around on the pan so they don’t stick.  Continue checking them every three to five minutes. As they develop a nice warm color, pull the pan from the oven, brush their tops with oil and flip them over.  They won’t all be ready to flip, nor will they all be ready to remove from the oven at the same time.  But every time you turn or remove some, the rest can be shifted just a bit to keep them from sticking.  If you don’t devour these delectable morsels as soon as they cool, you can serve them as a side dish; arrange them on lettuce or other greens, toss them with pasta, tuck them into a sandwich, or offer them as a finger food with a little dip.  

However you serve them, the results are elegant. And it is so easy to prepare.  It is best to stay in the kitchen while they cook, because you don’t want to let your poor roots get scorched.  You can use the time to toss a salad or set the table.  It’s fun and it’s yum!

~~~

Published by the Willapa Harbor Herald, December 4th, 2017.  Posted here with permission.

A previous version was previously published by the Hoopa People News, in 2007.

Copyright 2017,  Harvest McCampbell.  Please feel free to use the buttons below to share.  All other rights reserved.  

Thursday, September 06, 2012

Blue Agave


Agave americana is a traditional Native American source of food, fiber, needles and hooks, as well as a sweetener which is tapped from the flowering stalks or roasted out of the heart.  The flesh of the heart is also eaten after roasting, in addition to being dried and pounded (after roasting) to make a kind of flour, and the heart is also processed as a source of starch. 

While most of us will not be doing the research and the work necessary to process Agave for food, this plant is one of the sources for the Agave syrup sold today!  While this sweetener does agree with some people much better than other sweeteners; we cannot really consider the modern processed and refined agave syrup commonly sold to be either a low glycemic or an unprocessed food. (Commercial Agave syrup generally has a high carbon footprint and sometimes utilizing solvents, in addition to being very high in fructose.)  

More than likely I won’t be processing Agave for food, but I do plan on processing the leaves for fiber and needles. This was one of my Gram’s favorite plants.* She processed them for fiber and used the cords and needles as the weavers in her pine needle baskets!  Agave fiber is also used to make string, cord and rope, for nets, bags, and hammocks, as well as hats and some very fine basket work!  But even if you have no desire to utilize Agave for food or fiber, these drought tolerant architectural plants add fabulous color and textural to the landscape.  

Blue Agave grows slowly, eventually reaching to 14 feet high!  They bloom at maturity, anywhere from 15 - 35 years (sooner when kept in containers) and their bloom stalk can reach upwards of 25 feet! The main plant dies back after blooming, but the plants produce off-sets called “pups” throughout their lives.  These pups live on after their parent plant dies.  Blue Agave can also be kept small, by starting with young pups and keeping them in small sturdy containers.  If you have very bright light they will do OK indoors--but watch out for the spines.

The thorns and hooks are formidable, and the sap from the leaves can be allergenic--causing rashes and irritation for those susceptible.  Thick long sleeves, sturdy gloves, and eye protection should be worn when pruning, removing pups, or working around the plants.

This pup is about 6 inches from tip to base of bulb.
Propagation is generally accomplished by carefully removing the pups that form at the base of the plant.  Once they have formed the beginnings of a few leaves, as seen in the photo, they can survive on their own.  When young, they are often connected to the parent plant by a thick starchy root.  As much of this root as possible should be retained when potting the plants up, to help nourish the young plant.  This root eventually withers, even when the pups aren’t removed from their parent, and the pups form a starchy storage bulb at their base.  Pups should be planted with the thick root and/or pale colored storage bulb beneath the soil, and they should be kept a little on the moist side (but never soggy) for the first six months or so while they are establishing roots.  

Any well drained potting medium that you are familiar working with is fine.  The leaner the planting mix, the brighter the sun, the less water you supply, the slower they will grow.  Be careful of burning your pup, however.  Filtered sun is the best while they are establishing their roots.  Pups planted in rich potting medium, watered regularly (but never soggy) and kept in filtered or bright shade will grow the fastest; however, it will be difficult to get them accustomed to the sun without significant burning.  If you are going to eventually plant yours in full sun, they should be accustoming to at least a little sun from infancy.  Then as they establish their roots and begin to grow, you can get them used to receiving more sun gradually.   

The following plants are all about 6 months old, all from the same parent, but they have been grown out in different situations:


Grown in shade with good quality potting soil and regular watering. (6 inch pot.)


Grown in a gritty potting mix, in full sun, and watered only as absolutely necessary. (6 inch pot.)


Planted in the ground in unimproved soil, filtered shade, occasional supplemental water, with thick mulch.


Planted improperly (not deep enough) in full sun, with no mulch or supplemental water.  Please note--that while it hasn't grown, it also hasn't died either!


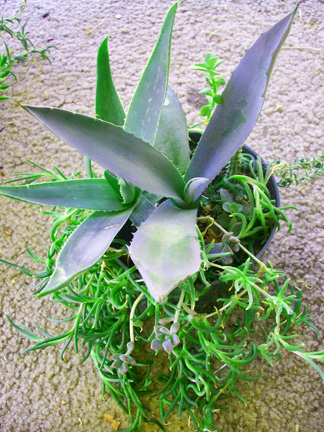
Just for fun--here is a mixed succulent container, also about the same age as the others,which includes an Aloe, mini ice plant, and a few Sedums.
If you are planning to plant yours in the ground, choose a well drained bright spot, away from plants that need moist soil.  Look up before committing to a certain spot, and make sure they can bloom without causing problems with overhangs or overhead wires.  Soil is not much of an issue, as long as it is well drained and never soggy.  These plants can reach outwards of ten feet across at maturity, so you need a spot with plenty of room!  They are hardy in the ground to 10F; they can withstand some snow, and once established they will only rarely request a little supplemental water.  In fact, it is best to plan on not watering them at all after their first year or two in the ground.  On the other hand, keep an eye on your container plants; let the soil dry out completely between watering once established, but do give them the occasional drink that they will need.  

Have you decided that you must have one of these fabulous plants for your very own?  You are in luck!  I occasionally have auctions for small to large pups on Listia.com. (Grown without any chemicals!) I can also list young rooted plants, or mixed containers that include young Blue Agave, which have all been grown in certified organic potting soil.  If you are looking for a larger specimen, I might be able to arrange for that also, but shipping and crating will be considerations.  Listia is an on-line bartering platform.  It's free, it works on points (called credits) and you can earn these credits a number of ways (by listing your own auctions, or by taking surveys--for instance).  And if eBay works better for you, just let me know.  If you have any question, please feel free to leave them in comments section below, or catch up with me on facebook.  https://www.facebook.com/harvest.mccampbell.
 
Here is a link to join Listia that fixes you up with some free credits:  https://www.listia.com/signup/.   Once you are a member you can check out my auctions here: http://www.listia.com/profile/1729366.  If I do not currently have an auction for Blue Agave listed, please feel free to contact me about your interest and I would be happy to put an auction up for you. (And again, I can put one up on eBay if that works better for you.
  
Happy Gardening!


*P.S.  My Gram was very wise!  I share some of her wisdom in each of my books; Sacred Smoke theAncient Art of Smudging for Modern Times and Food Security and Sustainability for the Times Ahead.


Tuesday, April 25, 2006

Summer Salsa – Mild or Spicy?


It's never too early to plan!


Day dreaming about salsa and the full savor of the summer garden is almost as cheering as a sunny day. The warm colors and flavors of tomatoes and peppers, the rich pungency of fresh herbs can easily be imagined while studying cook books and seed catalogs. Among the listings of heirloom varieties, brand new hybrids, and award winning selections are the perfect ingredients for summer salsa. If you’re like me, you want to try them all. But time, space, energy, and budget always bring us down to reality. Besides, there is a limit to how much time we want to spend chopping spicy peppers and processing jars of salsa.

You may want to make a list of your favorite varieties and map out where each will live. Next you will have to decide how to steal the time to get it all in the ground. (I manage by starting a few seeds at a time – so only a few plants are ready to go in the ground at any one time.) Our wet cool season weather can be forgotten for long moments while planing for summer salsa. If you have never grown a salsa garden before; you may be wondering which tomatoes are best, what herbs are traditional, and which peppers to choose for mild, rich, or spicy appeal.

Tomatoes are the backbone of most salsa recipes. My favorite are the medium sized, pear shaped, red Romas. They are a full flavored, old-fashioned, Italian tomato. They are equally good fresh, cooked, or canned. Romas are meaty and firm with a nice balance between acidic and sweet flavors. They process quickly for salsa, sauce, or catsup, unlike other juicier tomatoes. Whether you blanch or mill to remove the skins (or just pop them whole into the food processor) you will appreciate the time and energy savings gained by using Romas. They make a nice thick sauce with little or no cooking down. Romas are very reliable producers. They are also more tolerant of  the Pacific North West’s cool nighttime temperatures than many other varieties. Six plants should provide all but the serious salsa addicts with plenty to play with. They are generally available in six packs at nurseries and garden centers, once the weather warms up. Few pests bother tomatoes, save the dreaded tomato hornworm. Children can be hired to pluck these caterpillars from your plants should you notice leaves disappearing practically before your eyes. Tomatoes actually discourage gophers, particularly if staked or grown in cages. (While they don’t like the roots and the green parts are down right toxic, they will plow up the ground for a nice ripe tomato.)

Hot peppers tend to deter gophers also. And this aversion can be used to your benefit. Consider inter-cropping your hot, sweet, and bell peppers. This will help protect the less robust peppers from the gophers. Peppers add spice, color, and complexity to a salsa’s flavor. Sweet, bell, and hot types can all be found in green, yellow, orange, and purple varieties. The very best salsas use a mix of types, blended according to taste. Thai Dragons and Chili Tepins are some of the very hottest peppers available. They do not add much meat or flavor, but they really pour on the heat. Some folks prefer the meaty spicy flavor of Jalapeno peppers. But if having your mouth on fire doesn’t seem like fun, look for the much milder Poblana chili. Poblanas lend them selves to smoking or fire roasting. If you like the authentic mildly spicy flavor of roasted chilies in your salsa this is the one for you. One or two Thai Dragons and / or Tepin plants ought to give you all the hot chilies you need, if they are planted in a sunny spot and receive plenty of water. Poblanas are not as productive, if you like a mild salsa and plenty of it, you may find that 3 – 6 plants are needed. Don’t forget to save some room for a few bell pepper and sweet pepper plants in a variety of colors. Not only do the colors dress up your salsa, they add to the rich complexity of flavors.

Nothing enhances fresh and home caned salsa like just picked herbs. Basil, oregano, cilantro, chives, and parsley are all easy to grow, attractive in the garden, and oh so flavorful. Basil is considered a tender annual. It definitely won’t take any frost, and it finishes its life cycle in a single summer. It can be started indoors under lights, or purchased as small plants after all danger of frost is past. For salsa I prefer the bush or sweet varieties. However, if you seek them out, basil varieties abound. Just for fun you may want to plant several varieties, replanting your favorites at mid and late summer for a full season of flavor.

Oregano and chives are considered herbaceous perennials. That means they live longer than three years, dying back to the ground in winter and emerging in spring. Unlike basil, which can be cut within a few months of planting – it can take nearly a full season for both the oregano and chives to be ready to cut. If you start with seeds it can take even longer. Keep your eye out for young plants at the nursery, or start seeds soon. You don’t need to be worried about frost with oregano, chives, cilantro, or even parsley. So there is no need to wait for warm weather.

Green and Gold Oregano are nice additions to any garden.


Parsley is considered a biennial. That means that it generally takes two years to complete its life cycle. The first summer it will concentrate on making leaves, and the next summer it will flower and set seed. Parsley should be planted every year for continuous production. The best types for salsa are the Italian, flat, or plain leafed varieties. They also have the least problems with pests. Once the plants have reached at least 6 inches high, you can begin cutting leaves for kitchen use. Once your herbs begin flowering pinching out the flower heads before opening will keep the plants bushy and productive.

Your salsa garden should be planted out in as sunny a spot as you can spare. Raised beds or containers will work, especially if you want to get started while the soil is still cold and soggy. However, anything planted in raised beds or containers will need extra attention and watering in the heat of summer. Tomatoes, peppers, and herbs can also be tucked into the landscaping or planted out in a garden patch. In my yard, it is hard to tell where the landscaping ends and the garden begins. Which may be why I am attracted to vegetables and herbs with visual appeal.

For tomatoes and peppers (as well as many other plants) I use a modified British gardening technique. It can be used in established raised beds, garden plots, or when tucking edibles into the landscaping. Start by digging a 12 – 18 inch planting hole. Six to eight inches of organic matter is layered into the bottom of the hole. The organic matter is then covered with four to six inches of a mix of garden dirt and screened or purchased compost. Young plants are then nestled in, leaving a depression for summer watering. (Don’t forget to provide them with a fortress of sticks to keep the birds and cats from digging in the fresh soil.) After the weather dries and the soil firms up, mulch thickly with a layer of newspaper covered with grass clippings, wood chips, or other mulch. This helps hold down the weeds, reduces water loss from the soil, and provides more organic matter for the worms and microorganisms to utilize in the soil nutrient cycle.

If you would like to give this easy technique a try, just don’t bury anything that is going to smell like food to a hungry animal. They will dig it back up and ruin all your hard work. You will also have to keep an eye on your plants. If you’re earthworms are on vacation, occasionally the organic matter may utilize more nitrogen than it provides as it breaks down. If this is the case your plants will not look as bright green as they should. But this is a problem that is easy to remedy.

A good population of earthworms will make quick work of any buried organic matter. Worm activity increases the nitrogen and other nutrients available to plants. It improves the tilth and texture of the soil. Worms also improve water retention, penetration, and drainage. All they ask in return is to be fed plenty of organic matter. If your soil seems to be deficient in earthworms you can always purchase small containers anywhere they sell live bait for fishing. Night-crawlers and red-wigglers are the main workhorses of healthy garden soil.

While you are waiting for the worms to get busy, if your plants look a little pale, you might want to provide them with some extra nitrogen. Top dress the soil with a goodly handful of coffee grounds, compost enriched with chicken manure, any other composted manure, or a big pinch of bat guano. Any of these will increase the available nitrogen as well as other important nutrients. The results of your labors will provide the spice of summer life and next falls glorious salsas.

Seed Source: I found one catalog that has all my favorite salsa ingredients! If you have some favorite salsa recipes, be sure to look them over before you complete your list of plants or seeds. Then if you’re local nursery (or your favorite seed saving auntie) doesn’t have what you need check out http://www.thompson-morgan.com (800) 274-7333. (They list the cilantro as coriander.)

Stay tuned! Next week we will take a look at 5 free sources of organic matter that can easily be used to improve soil, feed worms, and contribute to our health and the health of our Eco-systems.

1,657 words
Copyright 2006, Harvest McCampbell
Published by the Hoopa Valley People Newspaper 4/18/06
Posted here with permission.