Thursday, September 06, 2012

Blue Agave


Agave americana is a traditional Native American source of food, fiber, needles and hooks, as well as a sweetener which is tapped from the flowering stalks or roasted out of the heart.  The flesh of the heart is also eaten after roasting, in addition to being dried and pounded (after roasting) to make a kind of flour, and the heart is also processed as a source of starch. 

While most of us will not be doing the research and the work necessary to process Agave for food, this plant is one of the sources for the Agave syrup sold today!  While this sweetener does agree with some people much better than other sweeteners; we cannot really consider the modern processed and refined agave syrup commonly sold to be either a low glycemic or an unprocessed food. (Commercial Agave syrup generally has a high carbon footprint and sometimes utilizing solvents, in addition to being very high in fructose.)  

More than likely I won’t be processing Agave for food, but I do plan on processing the leaves for fiber and needles. This was one of my Gram’s favorite plants.* She processed them for fiber and used the cords and needles as the weavers in her pine needle baskets!  Agave fiber is also used to make string, cord and rope, for nets, bags, and hammocks, as well as hats and some very fine basket work!  But even if you have no desire to utilize Agave for food or fiber, these drought tolerant architectural plants add fabulous color and textural to the landscape.  

Blue Agave grows slowly, eventually reaching to 14 feet high!  They bloom at maturity, anywhere from 15 - 35 years (sooner when kept in containers) and their bloom stalk can reach upwards of 25 feet! The main plant dies back after blooming, but the plants produce off-sets called “pups” throughout their lives.  These pups live on after their parent plant dies.  Blue Agave can also be kept small, by starting with young pups and keeping them in small sturdy containers.  If you have very bright light they will do OK indoors--but watch out for the spines.

The thorns and hooks are formidable, and the sap from the leaves can be allergenic--causing rashes and irritation for those susceptible.  Thick long sleeves, sturdy gloves, and eye protection should be worn when pruning, removing pups, or working around the plants.

This pup is about 6 inches from tip to base of bulb.
Propagation is generally accomplished by carefully removing the pups that form at the base of the plant.  Once they have formed the beginnings of a few leaves, as seen in the photo, they can survive on their own.  When young, they are often connected to the parent plant by a thick starchy root.  As much of this root as possible should be retained when potting the plants up, to help nourish the young plant.  This root eventually withers, even when the pups aren’t removed from their parent, and the pups form a starchy storage bulb at their base.  Pups should be planted with the thick root and/or pale colored storage bulb beneath the soil, and they should be kept a little on the moist side (but never soggy) for the first six months or so while they are establishing roots.  

Any well drained potting medium that you are familiar working with is fine.  The leaner the planting mix, the brighter the sun, the less water you supply, the slower they will grow.  Be careful of burning your pup, however.  Filtered sun is the best while they are establishing their roots.  Pups planted in rich potting medium, watered regularly (but never soggy) and kept in filtered or bright shade will grow the fastest; however, it will be difficult to get them accustomed to the sun without significant burning.  If you are going to eventually plant yours in full sun, they should be accustoming to at least a little sun from infancy.  Then as they establish their roots and begin to grow, you can get them used to receiving more sun gradually.   

The following plants are all about 6 months old, all from the same parent, but they have been grown out in different situations:


Grown in shade with good quality potting soil and regular watering. (6 inch pot.)


Grown in a gritty potting mix, in full sun, and watered only as absolutely necessary. (6 inch pot.)


Planted in the ground in unimproved soil, filtered shade, occasional supplemental water, with thick mulch.


Planted improperly (not deep enough) in full sun, with no mulch or supplemental water.  Please note--that while it hasn't grown, it also hasn't died either!


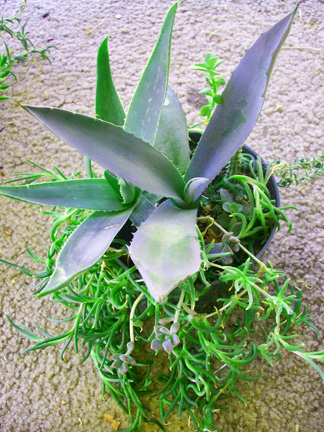
Just for fun--here is a mixed succulent container, also about the same age as the others,which includes an Aloe, mini ice plant, and a few Sedums.
If you are planning to plant yours in the ground, choose a well drained bright spot, away from plants that need moist soil.  Look up before committing to a certain spot, and make sure they can bloom without causing problems with overhangs or overhead wires.  Soil is not much of an issue, as long as it is well drained and never soggy.  These plants can reach outwards of ten feet across at maturity, so you need a spot with plenty of room!  They are hardy in the ground to 10F; they can withstand some snow, and once established they will only rarely request a little supplemental water.  In fact, it is best to plan on not watering them at all after their first year or two in the ground.  On the other hand, keep an eye on your container plants; let the soil dry out completely between watering once established, but do give them the occasional drink that they will need.  

Have you decided that you must have one of these fabulous plants for your very own?  You are in luck!  I occasionally have auctions for small to large pups on Listia.com. (Grown without any chemicals!) I can also list young rooted plants, or mixed containers that include young Blue Agave, which have all been grown in certified organic potting soil.  If you are looking for a larger specimen, I might be able to arrange for that also, but shipping and crating will be considerations.  Listia is an on-line bartering platform.  It's free, it works on points (called credits) and you can earn these credits a number of ways (by listing your own auctions, or by taking surveys--for instance).  And if eBay works better for you, just let me know.  If you have any question, please feel free to leave them in comments section below, or catch up with me on facebook.  https://www.facebook.com/harvest.mccampbell.
 
Here is a link to join Listia that fixes you up with some free credits:  https://www.listia.com/signup/.   Once you are a member you can check out my auctions here: http://www.listia.com/profile/1729366.  If I do not currently have an auction for Blue Agave listed, please feel free to contact me about your interest and I would be happy to put an auction up for you. (And again, I can put one up on eBay if that works better for you.
  
Happy Gardening!


*P.S.  My Gram was very wise!  I share some of her wisdom in each of my books; Sacred Smoke theAncient Art of Smudging for Modern Times and Food Security and Sustainability for the Times Ahead.


Wednesday, August 29, 2012

Garland Chrysanthemum

I first encountered this unusual edible while trying to occupy myself at a rather thankless job. Thirty years ago I occasionally substituted as a care provider for an elderly Japanese man. He resented having a “babysitter” and made a point of not speaking to me, unless it absolutely could not be avoided. Once I got him fed and settled in his favorite chair, I entertained myself on the other side of a screen door--out in the family’s garden.

They grew all kinds of Japanese vegetables, from very long thin cucumbers and beans to bitter melons with interesting textured skin. I weeded and watered their garden every day. When Amy, the lady of the house, came home from work I always asked her to tell me about one of their plants.  I had noticed a type of chrysanthemum growing alongside their giant black radishes. I didn’t understand why it was growing in their vegetable garden. Unlike my bio-diverse plantings, their vegetables and flowers were grown in well defined, separate beds.

Amy, who hired me to look after her grandfather, explained that the plant was not grown as an ornamental, that it was an edible chrysanthemum. She told me its Japanese name, shungiku, which she said translated as chop suey green. The next time I came to their house she had made chop suey with shungiku for me to taste.  I liked it then, and I still do. I think you will like it too!

Shungiku is most commonly called garland chrysanthemum in this country, and it is much more common place in American gardens and cooking than it was 30 years ago. It is often included in the micro salad mixes that are now available almost everywhere. Even though you may have never heard of chrysanthemums being edible, it is fairly likely that you have already tried them. There are several varieties available, some more tender and mild and others with more robust flavor. The one I grow in my garden is called round leaf. It has a mild flavor that is best described as a subtle smoky imitation of cilantro, with undertones of mint and anise. 

Garland chrysanthemum originated in China, where it has been grown since at least 1400 BC. It made its way to Japan by the year 900 AD, and was so esteemed that it soon became associated with royalty. In Japan, the greens are used to flavor soups and “hot pots,” by chopping and adding the leaves and tender stalks in the last few minutes of cooking. They are also tasty in stir fries and other mixed vegetable dishes, and their flavor combines well with tomatoes. I have been known to tuck a few chopped leaves into my spaghetti and salsa, where it tastes divine.

 Unlike many of the ornamental chrysanthemums we grow in our flower beds, edible chrysanthemums are annuals. They thrive in cool moist climates and are very adaptable to fall, winter, and early spring gardens. Garland chrysanthemum is very easy to grow from seeds or young starts. You are most likely to find seed available through specialty mail order sources or very well stocked seed counters. 

Seeds germinate best when daytime temperatures are between 60 and 70 degrees, making our mild falls an excellent time to get started. They can be started in six packs, flats, on paper towels in plastic bags, or right out in the garden (if slugs are not a problem). The seeds should be barely covered with potting soil or sand, as they germinate best when exposed to natural daylight. Seeds should germinate in two to three weeks. If you don’t start them right out in the garden or in six packs, they should be moved to small separate containers as soon as they push up their first green leave. Keep a mister handy.  These little guys don’t like to dry out.

When your young plants are a few inches high, they are ready to be transplanted out in the garden. They will benefit from some shade until the weather cools off. They will tolerate light or part shade through the winter. If you have a bright spot where they might get some sun during the rainy season, they will be most happy to sink their roots right there.  Garland chrysanthemum plants are not overly particular about soil. They will survive in clay, as long as drainage is adequate. In gravely and sandy soils special attention will need to be paid to keeping the soil moist until the rains start.

The only pests that have ever bothered my garland chrysanthemum are those sneaky and slimy slugs. Frogs, turtles, and hand picking nights and mornings are the best defense. But if your slug population isn’t too bad just waiting until the plants are a few inches high before you plant them out, might be all the defense you need. 

You can start harvesting young leaves and shoots once your plants reach about four inches high.  Simply pinch the plants back by about half, making sure to leave at least four leaves behind.  They will send out new tender shoots from the buds at the base of each of those leaves. Those shoots can also be pinched when they have grown to about four inches. By frequently pinching your plants you will eventually get a stocky productive plant that will keep you in savory greens straight through the winter and into early spring.

Once the weather warms up your garland chrysanthemum will insist on making flower buds.  You can pinch them out and toss them into salads and soups just the same as you did the young leaves and shoots. By spring your taste buds will probably be ready for a change of pace, and the bright yellow medallion flowers definitely brighten up the spring garden.  They can be picked for bouquets, or left in the garden to attract butterflies and predatory insects.

Once the flowers fade you can either remove the plants or let them develop seed. Garland chrysanthemum has been in cultivation for so long that it has lost its ability to disperse its seed. It is not very successful at self sowing. Keep an eye on your plants, when the seed heads are dry firmly rub your thumb across their tops while holding a pie pan below to catch the seeds that fall.  Let the seed air dry inside out of direct sun until they feel crisp. Then store in a jar, envelope, or plastic bag in a cool dry spot until next fall. Then you will be all set to start all over again.

If you can’t find garland chrysanthemum at your local nursery or in your favorite catalog check out http://www.Evergreenseeds.com  (714) 637-5769. They offer five different varieties favored in different Asian cuisines.  They also have a fabulous selection of other oriental vegetable seeds.

Copyright 9.19.07 Harvest McCampbell, previously published in the Hoopa People Paper.  Please contact me for permission to reprint or post.


Update:  5.27.15  There are many varieities of garland chrysanthemum, which is also sometimes called chop suey greens. The variety we have at Growing Together Community Garden in South Bend WA is particularly flavorful!  Garland chrysanthemum does not produce nor survive over the winter here, even though it is known to do so in much colder climates.  The angle of the sun and the shortness of the day during our winters is a huge challenge for the winter gardener.  However, garland chrysanthemum can be grown here early spring through late fall.


Tuesday, August 28, 2012

Golden Torch Cereus


That's me, with the Golden Torch!
Every garden, even if it is just a few containers on a patio, needs a few fabulous selections simply to delight the gardener.  Golden Torch Cereus fills that bill!  The flowers are simply stunning:  from the furry chocolate colored buds which, as they swell, resemble some kind of freakish sci-fi fantasy; and then as they open to dramatic flowers with a faint scent of almond extract and honey.  The large blooms open over an afternoon, remain open all night and for most of the next day, and by the following afternoon they fade.  But the spent flowers with their unusual furry fruit retain some visual interest.  

Some flowering cactus bloom just once a year; but this, as yet unnamed, selection of Golden Torch Cereus (Echinopsis spachiana) produces occasional flushes of flowers throughout the summer.  They need full sun to bloom the best; however, they are not fond of reflected heat from buildings, driveways, and roads—so be very careful with their placement.  (Reflected heat will scorch their columns which is unsightly, but they still seem to grow and flower just fine.)  They will grow and bloom in containers—so planting yours in a container until you fine tune its placement is a good idea.

Furry fluffy flower bud!
Even when not in bloom the spires are fabulous, with their golden spines on the crown, which gradually fade to a silvery sheen as the cactus grows.  While most selections of Golden Torch are not deemed frost resistant, this selection withstood temperatures down to 10F this past winter. This includes those planted in the ground and one that overwintered in a container outdoors.  I have several mature plants, here in zone 8, so I am certain they will survive outdoors in zone 8 and higher.  We receive an average of 29 inches of rain a year, all in the cool season, and have very good drainage.  In wetter and colder areas containers might be the preferred planting option so they can be moved to an appropriate spot over the winter.  

Buds are nearly ready to open!
Before considering adding Golden Torch Cereus to your collection, you must consider the thorns.  These thorns are treacherous, they are persistent, they don’t seem to decompose, and they will go right through Crocks and flip-fops and give you a good hard jab.  But if you have got to have them, you have got to have them.  

If the thorns haven’t scared you away, I occasionally have auctions for cuttings of this plant on Listia.com.  Listia is an on-line bartering platform.  It's  free, it works on points (called credits) and you can earn these credits a number of ways (by listing your own auctions, or by taking surveys--for instance).  If you have any question, please feel free to leave them in comments section below.  Here is a link to join that fixes you up with some free credits:  https://www.listia.com/signup/1729366.  Once you are a member you can check my auctions here: http://www.listia.com/profile/1729366.  If I do not currently have an auction listed, please feel free to contact me (on Listia or here in comments) about your interest and I would be happy to put an auction up for you, if I currently have extra pieces. (I can also list on E-bay, if that works better for you.) 

Fabulous flowers last about 24 hours.
Eventually, I am also going to experiment with germinating seeds from the mature fruit (which is said to be edible).  If I am successful and if you are patient this might be another way to obtain these beautiful plants. Unfortunately, seed grown plants are always genetically diverse, and they may not retain the cold hardiness of their parent. If I get the seeds to grow and prosper, I will add a comment to this post so you will know!


Fruit!
I  offer Golden Torch Cereus as column sections, with or without terminal buds; or as small offshoots with terminal buds. Be prepared for some very nasty thorns when opening the box. (They can draw blood!) Heavy leather gloves are recommended!  Gently press your gloved fingers against the side of the cactus—and if you find the spines are penetrating your gloves, try using some pieces of block Styrofoam packing material to move your cactus around.  Before planting, any recently cut ends will need to be allowed to callus.  Simply leave your cutting in a shady cool spot away from moisture and let it rest for a week or two.   The spines can pick up debris, much like giant Velcro, and that debris is hard to remove—so choose your spot carefully.  Additionally you do not want anyone to accidentally touch, step on, or fall on the cactus—the spines are mean!    

Bland and mushy.
Once the cut end(s) look and feel dry, carefully look your cutting over, for roots and growth buds.  If you find any roots growing along the middle of the column, you can ignore them if you like, or you can plant it flat with that end down—with any growth buds pointed up.  If you are going to plant your cactus vertically, any roots should go down into your potting soil, any growth points should be at the top.  When working with column pieces without growing points or roots, the most callused end is the best to plant in the soil.  (These pieces will eventually develop buds, most often two, which will each form a new column.) Offsets also need their cut ends to callus before planting.  Once they are callused they can be balanced or propped on the soil, with the cut end nestled down into the potting medium and the growth tip pointing up.  
Attractive even when not in bloom!

A few words on soil; my soil outside is nasty.  It is a mix of heavy adobe clay well sprinkled with lots of rock and gravel, as well as layers of grey volcanic ash and red volcanic dust and cinders.  My container planted specimen is growing in shredded paper!  Now, I don’t recommend you try to duplicate either of these settings.  For containers, any lean well drained potting mix ought to do just fine. You can add some garden soil and sand to what you have on hand, or purchase a ready-made cactus blend.  Outdoors, probably anything you have will be just fine, as long as it never gets soggy.  

Rooted  and established column section.

Water your Golden Torch Cereus very sparingly.  My mature plants receive no supplemental water at all.  The column pieces I planted in the ground this summer also received no supplemental water at all, and they bloomed and have been growing!  I started a piece of column, which was cut on both ends, in a container last winter.  It has two well established young columns now, and as it is in a very hot spot along a south facing wall—I do give it some additional water, when the soil is dry.  I haven’t noticed any signs of rot.  However, it is scorching and I do need to move it until the weather cools off.


If you have any questions, comments, or tips—please feel free to leave them in comments!