One turnip seed, planted in rich soil, in a five
gallon container, can grow to feed a family; if it is carefully nurtured.
First, that little seed will send out tiny leaves. Those leaves will eventually
grow large and plentiful enough that you won’t mind pinching a few to add to
salads and soups. As summer fades into the cool part of the year, the plant will
produce many leaves. Each leaf only lives a month or so. By watching them
carefully and experimenting, you gradually learn when they are best for adding
to salads (young and tender) and how long you can wait to use them as cooked
greens. Your turnip plant will continue to produce leaves straight through
winter and on into earliest parts of spring. (This article was written in 2008, in California. Here in Pacific County, Washington, many veggies are prone to going dormant over the winter. Be careful not to take too many leaves over the cold dark months.)
 |
| Turnip Greens |
The flowers will be followed by tender turnip
“beans.” The young edible seed pods are tasty, cooked or raw. They can even be
pickled if you are feeling industrious. But be sure to let some of the seed
pods mature. Because the seeds that will follow have even more promise, even
more to give.
Mature seed pods are the color of straw, and the pop
when squeezed, revealing a number of amber to nearly black, small, round seeds.
Collect the stems with mature pods into a brown shopping bag and allow them to
dry completely, away from irrigation and other moisture. Once dry, use your
hands to crunch up the stems and pop the pods. Slowly remove each stem, popping
any intact pods as you do. Then shake the bag to encourage the seeds to settle
at the bottom. You will have a mix of
chaff from the seed pods and seeds in the bag. Reach into the bag with both
hands, grab a handful of the chaff, and toss it back and forth to further
encourage the seeds to fall. (The chaff and the stems make great additions to
the compost pile or your garden’s layers of mulch.)
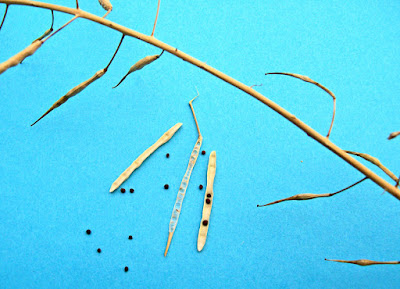 |
| Turnip Seeds |
When you get to the bottom of the bag you should
have more turnip seeds than you really want to grow. Plant out a row or two,
and save the rest of the seeds. You can pinch the young greens as you did with
your single turnip, and you can also begin pulling tender young turnips in six
to eight weeks. Turnips are excellent raw, roasted, mashed, fried, steamed, or
boiled. Extra seeds can be shared with friends and family. (Or traded with
other seed savers for seeds of other crops!)
They can also be grown and used just like alfalfa sprouts; and the dry seeds
can be ground or used whole as a tangy mustard seed substitute.
Turnips have been utilized as survival foods and as
staples in many parts of the world when grain crops, trade, or transportation
have been problematic. For fun, for variety, and for food security, consider
planting a row of turnips in your garden this month. Don’t forget to save a
seed to plant in a five gallon container, so you can demonstrate the power of
one turnip seed.
~~~
Excerpted from: Digging the Dirt / July in the Garden, from the article originally published in the Hoopa People Paper in 2008, Copyright Harvest McCampbell
~~~
I now live in Pacific County Washington, where I am currently the Growing Together Community Garden coordinator. We are hand selecting mildew free turnips for seed saving!

You can read a little about this effort on our Facebook page.
Thanks for visiting! Come back again!