Friday, June 16, 2006

Sweet Alyssum


Once upon a time a long, long time ago I had a small market garden in Napa County. I was all of eight years old and I sold my tomatoes, squash, and flowers from a large garden cart beside the road. Warm afternoons I could be found hose in hand, keeping my garden lush and green. However, I had one spot I never watered. It was my “Magic Garden.”

The Magic Garden occupied the hottest spot in the yard. It consisted of a narrow foundation-planting strip sandwiched between the south wall of the stucco house and a long asphalt driveway. Not only was this the hottest part of the yard, it was also the wettest spot in the winter. And it was in this very spot that I first fell in love with Sweet Alyssum.

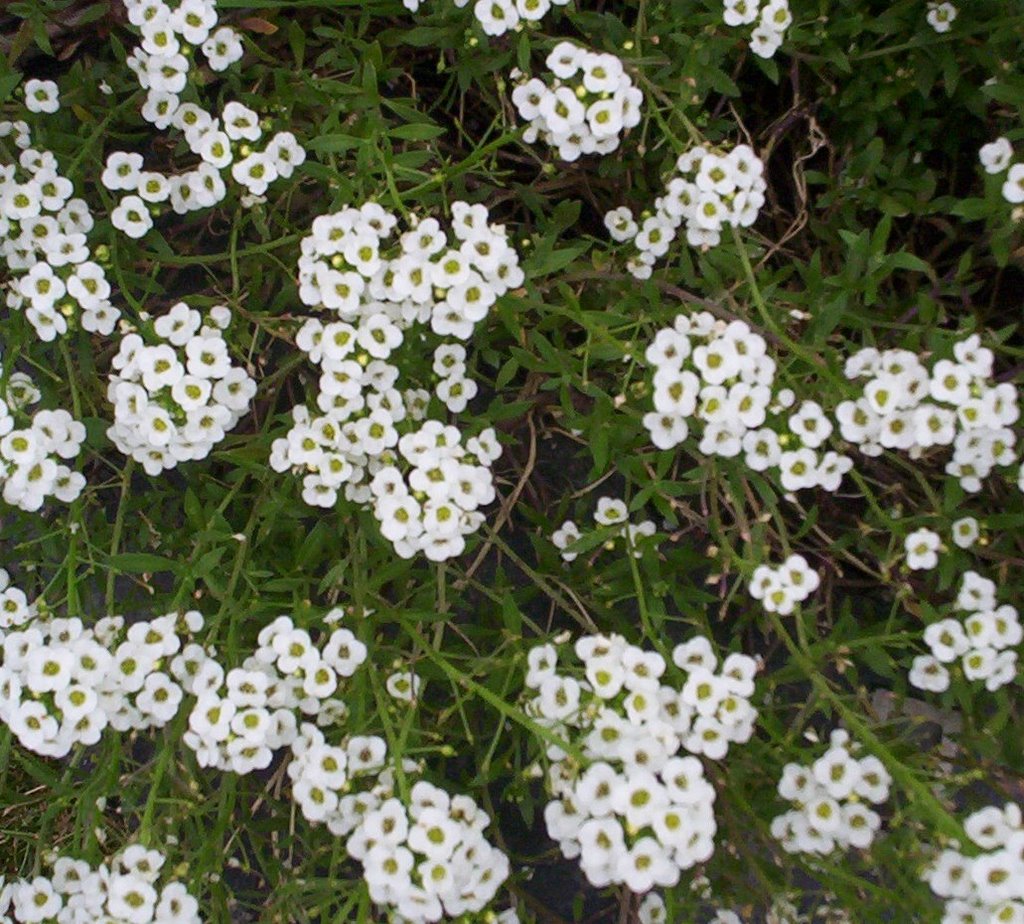
Most mornings I would wake up early and run out to inhale the fresh sweet scent of the rose and white flowered alyssum that bloomed nearly year around. I was sure that among the insects that visited the small delicate looking flowers that real fairies could be found. As hard as I worked for my other flowers, I always appreciated the alyssum, which thrived on so little care. I pulled a weed or two from time to time and other than that, they completely took care of themselves.

Pam Pierce, in Wildly Successful Plants for Northern California (Sasquatch Books) list Sweet Alyssum as one of a handful of plants that thrive in our area with little or no care. She reports finding Alyssums reseeding and naturalized in long abandoned gardens and estates. She also notes that the offspring of selected hybrids may not be as compact and the colors may not be so vibrant but that these seedlings are likely to be even tougher than their parents.

Depending on the reference, Alyssum is listed as either a hardy annual or a short-lived perennial. Plants are generally low growing, from about 3 to 8 inches tall, with nearly an equal spread when mature. They can be planted in spring or fall; if you really don’t plan to water them, plant them in the fall. That way they can develop deep roots systems before summer’s drought sets in. And they will bloom all winter, which is a great bonus. Sweet Alyssum plants make excellent rock garden specimens, edging for pathways and garden borders, and they look fabulous spilling out of window boxes and containers.

Alyssum also deserves a place in vegetable and herb gardens. Herb gardens often incorporate plants of historic or anecdotal interest. The name of this flower (alyssum) comes from the Greek and means “without madness.” Sweet Alyssum was once added to bouquets to signify forgiveness, apology, or otherwise request an end to hostilities. Today it is used in flower essence remedies to overcome anger, madness, and their after effects. While I can’t vouch for this particular theory, gardening is generally considered therapy, and what better therapy could there be than a sweet flower?

This garden therapy is also therapy for your vegetable garden. These flowers make great living mulch, and they attract beneficial insects who will stay to hunt among your plantings. Speaking of vegetables, Alyssum flowers are edible! The flowers don’t really taste anything like they smell. They have a slightly sweet and peppery flavor similar to kale. In fact Sweet Alyssum and kale are both in the Brassica family as are cabbage, cauliflower, broccoli and many other vegetables. All the Brassicas are considered nutritious and health giving. Sweet Alyssum is no exception. It was once used in Spain to treat and prevent scurvy – a condition caused by malnutrition.

While most of us won’t be serving a menu planned around Sweet Alyssum, a few colorful snips are lots of fun in the kitchen. They can be added to salad, frozen in ice cubes, folded into omelets, and added to cold summer soups. Sweet Alyssum when paired with a wedge or two of fruit or a sprig of parsley makes a fun edible garnish to dress up snack or desert trays. Be creative. How about a molded Jell-O or aspic salad with contrasting flowers nestled inside?

Sweet Alyssum comes in a pastel rainbow from white through a number of shades of rose, mauve, lilac, and purple. There are even some rare yellow and orange varieties you might run across in specialty nurseries. Most local nurseries and seed catalogs stock seeds and six packs of young plants in the common colors. Seed packets and six packs are often available in both single colors and mixes. I prefer to purchase the six packs and tuck them in here and there in the garden. The small seeds take a little care to bring to maturity and the tasty seedlings are a magnet for slugs. However, if slugs aren’t a problem in your garden the seeds can be broadcast in spring and fall. Keep the seed bed evenly moist until your plants are established and then you can ignore them if you must.

Sweet Alyssum is truly a carefree flower. It’s not particular about soil, soil amendments, fertilizer, or even water once it is established. It can thrive in full sun, or part shade. Past the seedling stage it is not likely to be bothered by pests, and it may actually reduce pest problems by attracting beneficial insects. The sweet flowers can be enjoyed over a long season, both in the garden and the kitchen. And if slugs aren’t a problem in your garden it is likely to self-sow bringing permanent delight to your borders and extra seedlings to share with your friends. If I could only plant a few flowers this season, Sweet Alyssum would be high on my list. I am sure you will enjoy them too.

Next week we will be taking a look at an easy to grow super food, that tastes pretty good too. It is high in iron, fiber, vitamins A, C, K and folate – and you can grow it all year round! Until then, you can always find me Digging the Dirt . . .

Copyright 2006 Harvest McCampbell, from my column "Digging the Dirt," published in The Hoopa Valley People Newspaper, June 6, 2006. Posted here with permission.


Related articles on attracting beneficial insects:
Beneficial Insects
More Beneficial Insects

Other Edible Flowers:
Cilantro
Daisies & Violets
Fennel
Pumpkin

Sunday, June 11, 2006

Seed Secrets

Seeds are like dreams. When you hold them in your hands you can imagine the future: trees lush with shade and summer fruit; vegetables from distant shores; fragrant and spicy herbs; flowers busy with butterflies and hummingbirds. Whatever green things you dream of, most of them start with seeds.

From the tiny veronicas that inhabit lawns and meadows to the giant sequoias of the Sierras, almost all flowering plants set seed. Gardeners with the patience to unlock the secrets of seeds can grow almost any flowering plant no matter how large or small. The key is understanding the needs of each variety you wish to grow.

While most seeds will be happy to take right off when planted in fairly warm soil and kept evenly moist, some seeds require a little more consideration. You can start by planting out only a portion of the seeds in a packet, to see how they will do, or you can do a little research first.

Many seeds will only germinate within narrow temperature ranges. For instance, most common summer vegetables need fairly warm soil temperatures. And soil temperature is often quite different than the temperature of the air. Other seeds have genetically coded dormancy periods that require a specific cold wet time period to stimulate germination. Some seeds need light and others need dark.

Fortunately, for most plants, this information is known and it is usually listed in seed catalogs or on the seed packages. But not always. Resources are listed at the end of the article just in case you are having trouble getting any of your treasured seeds to grow. Meanwhile, here are some basic tips and short cuts to help you unlock the secrets of seeds.

Large Seeds:

Larger seeds, like those from squash and pumpkins, generally germinate and grow quickly. They have a large store of energy to begin their life and are ready to spring into action. All they ask is a warm moist place to sink their roots and adequate sun light to start growing. A warm sunny window or porch makes a good starting place, or they can be planted out in the garden after the soil surface feels warm to the touch. I like to start a few seeds at a time – knowing full well that those I start before the soil warms up may not survive. But if they do and I get an early crop, that makes me smile.

There are exceptions to the large – quick rule. A common one is seed with hard or thick seed coats. Gourds and many trees and shrubs fall into this category. Often all that is necessary to get these seeds to grow is a well placed nick through the seed coat and a nice soak in tepid water over night. (When nicking seed coats it is important to avoid the portion that contains the plant embryo. Ask a gardening buddy for advice on this.) Some thick shelled seeds need to be cold stratified, or have other specific germination regimes. This, however, is more the concern of ornamental gardeners than vegetable gardeners.

Small Seeds:

Small seeds generally take longer to develop into vigorous plants, and the smaller the seed, the more tender loving care the young plant will need. Tomatoes can take four to six weeks from starting before they are ready to face down slugs in the garden, while our hearty pumpkins may be prepared to brave the real world in as little as two or three weeks. Tomatoes and other small seeded plants have limited food stored, so quality seed starting medium or potting soil, supplemental feeding, and lots of the right kind of light is essential.

Seed Starting Mediums:

Unless you have the time and energy to experiment, purchasing sterile seed starting medium is the way to go. These products are all ready screened, contain no weed seeds, bug eggs, or disease pathogens. For those on a limited budget, screened, sterilized compost or leaf-mold can be pressed into use. Make sure your material is well decomposed and all large pieces are removed. You can mix in a bit of sand if you like, to improve drainage. If we get a sunny day you can sterilize your mix outdoors. Evenly moisten your medium, spread it in an old metal baking pan, filling the pan to the top and gently tamping it down. Cover tightly with clear plastic wrap and place in the sun on a warm surface. An old car, or an asphalt, cement, or rock surface works well. Leave in the sun for the day, and your mix is ready to use.

Supplemental Plant Food:

Young seedlings can be feed fish emulsion (get the deodorized kind if you are keeping the plants inside), tea made from alfalfa pellets, diluted coffee, or commercial seed starting food. Fish emulsion and seed starting food are available through most seed catalogs and plant nurseries and will have directions on the label. For do it your selfers: One cup of brewed coffee, diluted, makes a full quart of seedling food and can be used once or twice a week. A handful of alfalfa pellets thrown into a gallon of water and left in the sun makes a nice supplemental plant food that can also be used once or twice a week. Some folks prefer manure or compost tea. More information on these can be found by searching on the Internet.

Light:

Plants need ultraviolet light to grow. The best source is the sun. However, grow lights and full spectrum lights are available for those of us who want to get an early start when our weather won’t allow it. If you are not ready to set up supplemental light, limit your early seed starting to sunny porches and windows. Start a few seeds at a time, and enjoy your fresh produce over a long season.

Space Saving Germination Trick:

My favorite way to start seeds is in zip lock bags. You can keep the seeds evenly moist without any effort, and it is easy check on the emerging seedlings progress. Layer 2 – 4 pieces of bathroom tissue over four pieces of newspaper cut to size. Moisten the stack, and evenly place 6 – 12 seeds on the surface. Slip this into a clean used (or new) reclosable sandwich sized bag. You can store a stack of these baggies in an evenly warm place, away from direct heat. Be sure to check daily. When the seedlings have developed their first seed leaves carefully remove the paper from the bag, and carefully transfer the seedlings to six packs or small pots of potting soil or seed starting medium. By starting seeds this way I find I get better germination rates, better seedling survival rates, and it definitely saves space.

Soil Thermometers:

A soil thermometer is a good investment for anyone serious about growing a large number of plants from seeds, particularly if you are interested in rare or exotic plants. They are also useful to the serious vegetable gardener. Most vegetables germinate best when the soil is between 70 – 90 degrees. Soil thermometers can be found for around $10.00 through many seed catalogs and plant nurseries.


On Line Resources:

The Seed Site
http://theseedsite.co.uk/seedpods.html
Scroll to the bottom of the page for links to information on germination, seed sowing, and seedlings. This site lists more varieties of seeds than most of us will grow in a life time.

Vegetable Germination Temperatures
http://www.heirloomseeds.com/germination.html
Easy to use chart gives soil temperature ranges for germination of commonly grown vegetables.


Books:

The Seed Starter’s Handbook, by Nancy Bubel, published by Rodale Press. Everything the serious vegetable gardener needs to know about starting their own seeds, from soil temperatures, days to germination, and much more.

Save Your Own Seed, By Lawrence D. Hill, published by The Henry Doubleday Research Association. This is a very cool little book that includes a chart on how long vegetable seeds can be saved. It is kind of surprising, some get old pretty quickly and some kinds can last for years.

Growing California Native Plants, by Marjory G. Schmidt, published by California Natural History Guides. Lots of information here on growing ornamental wild plants in the home landscape.

For more information see http://harvestsgardeningsecrets.blogspot.com and stay tuned, next week we will be exploring the wonderful uses of sweet alyssum. Mean while, you can probably find me out in the garden Digging the Dirt.

Copyright 2006 Harvest McCampbell
Published by the Hoopa Valley People Newspaper May 30, 2006
Posted here with permission